

Hello crafty friends.
Today I’m sharing two fruit basket thank you cards using some of the new products from Pretty Pink Posh’s June 2023 release.
This release is packed full of fruit-themed stamps, dies, and stencils. If you would like to see all of the products in the release, watch my unboxing video on YouTube or below.
You can purchase all of the products in one bundle and save 10 percent!!
To purchase the June 2023 bundle click HERE.
To purchase the stencil bundle, click HERE.
If you would like to see how I made this card, watch my video on YouTube or below.
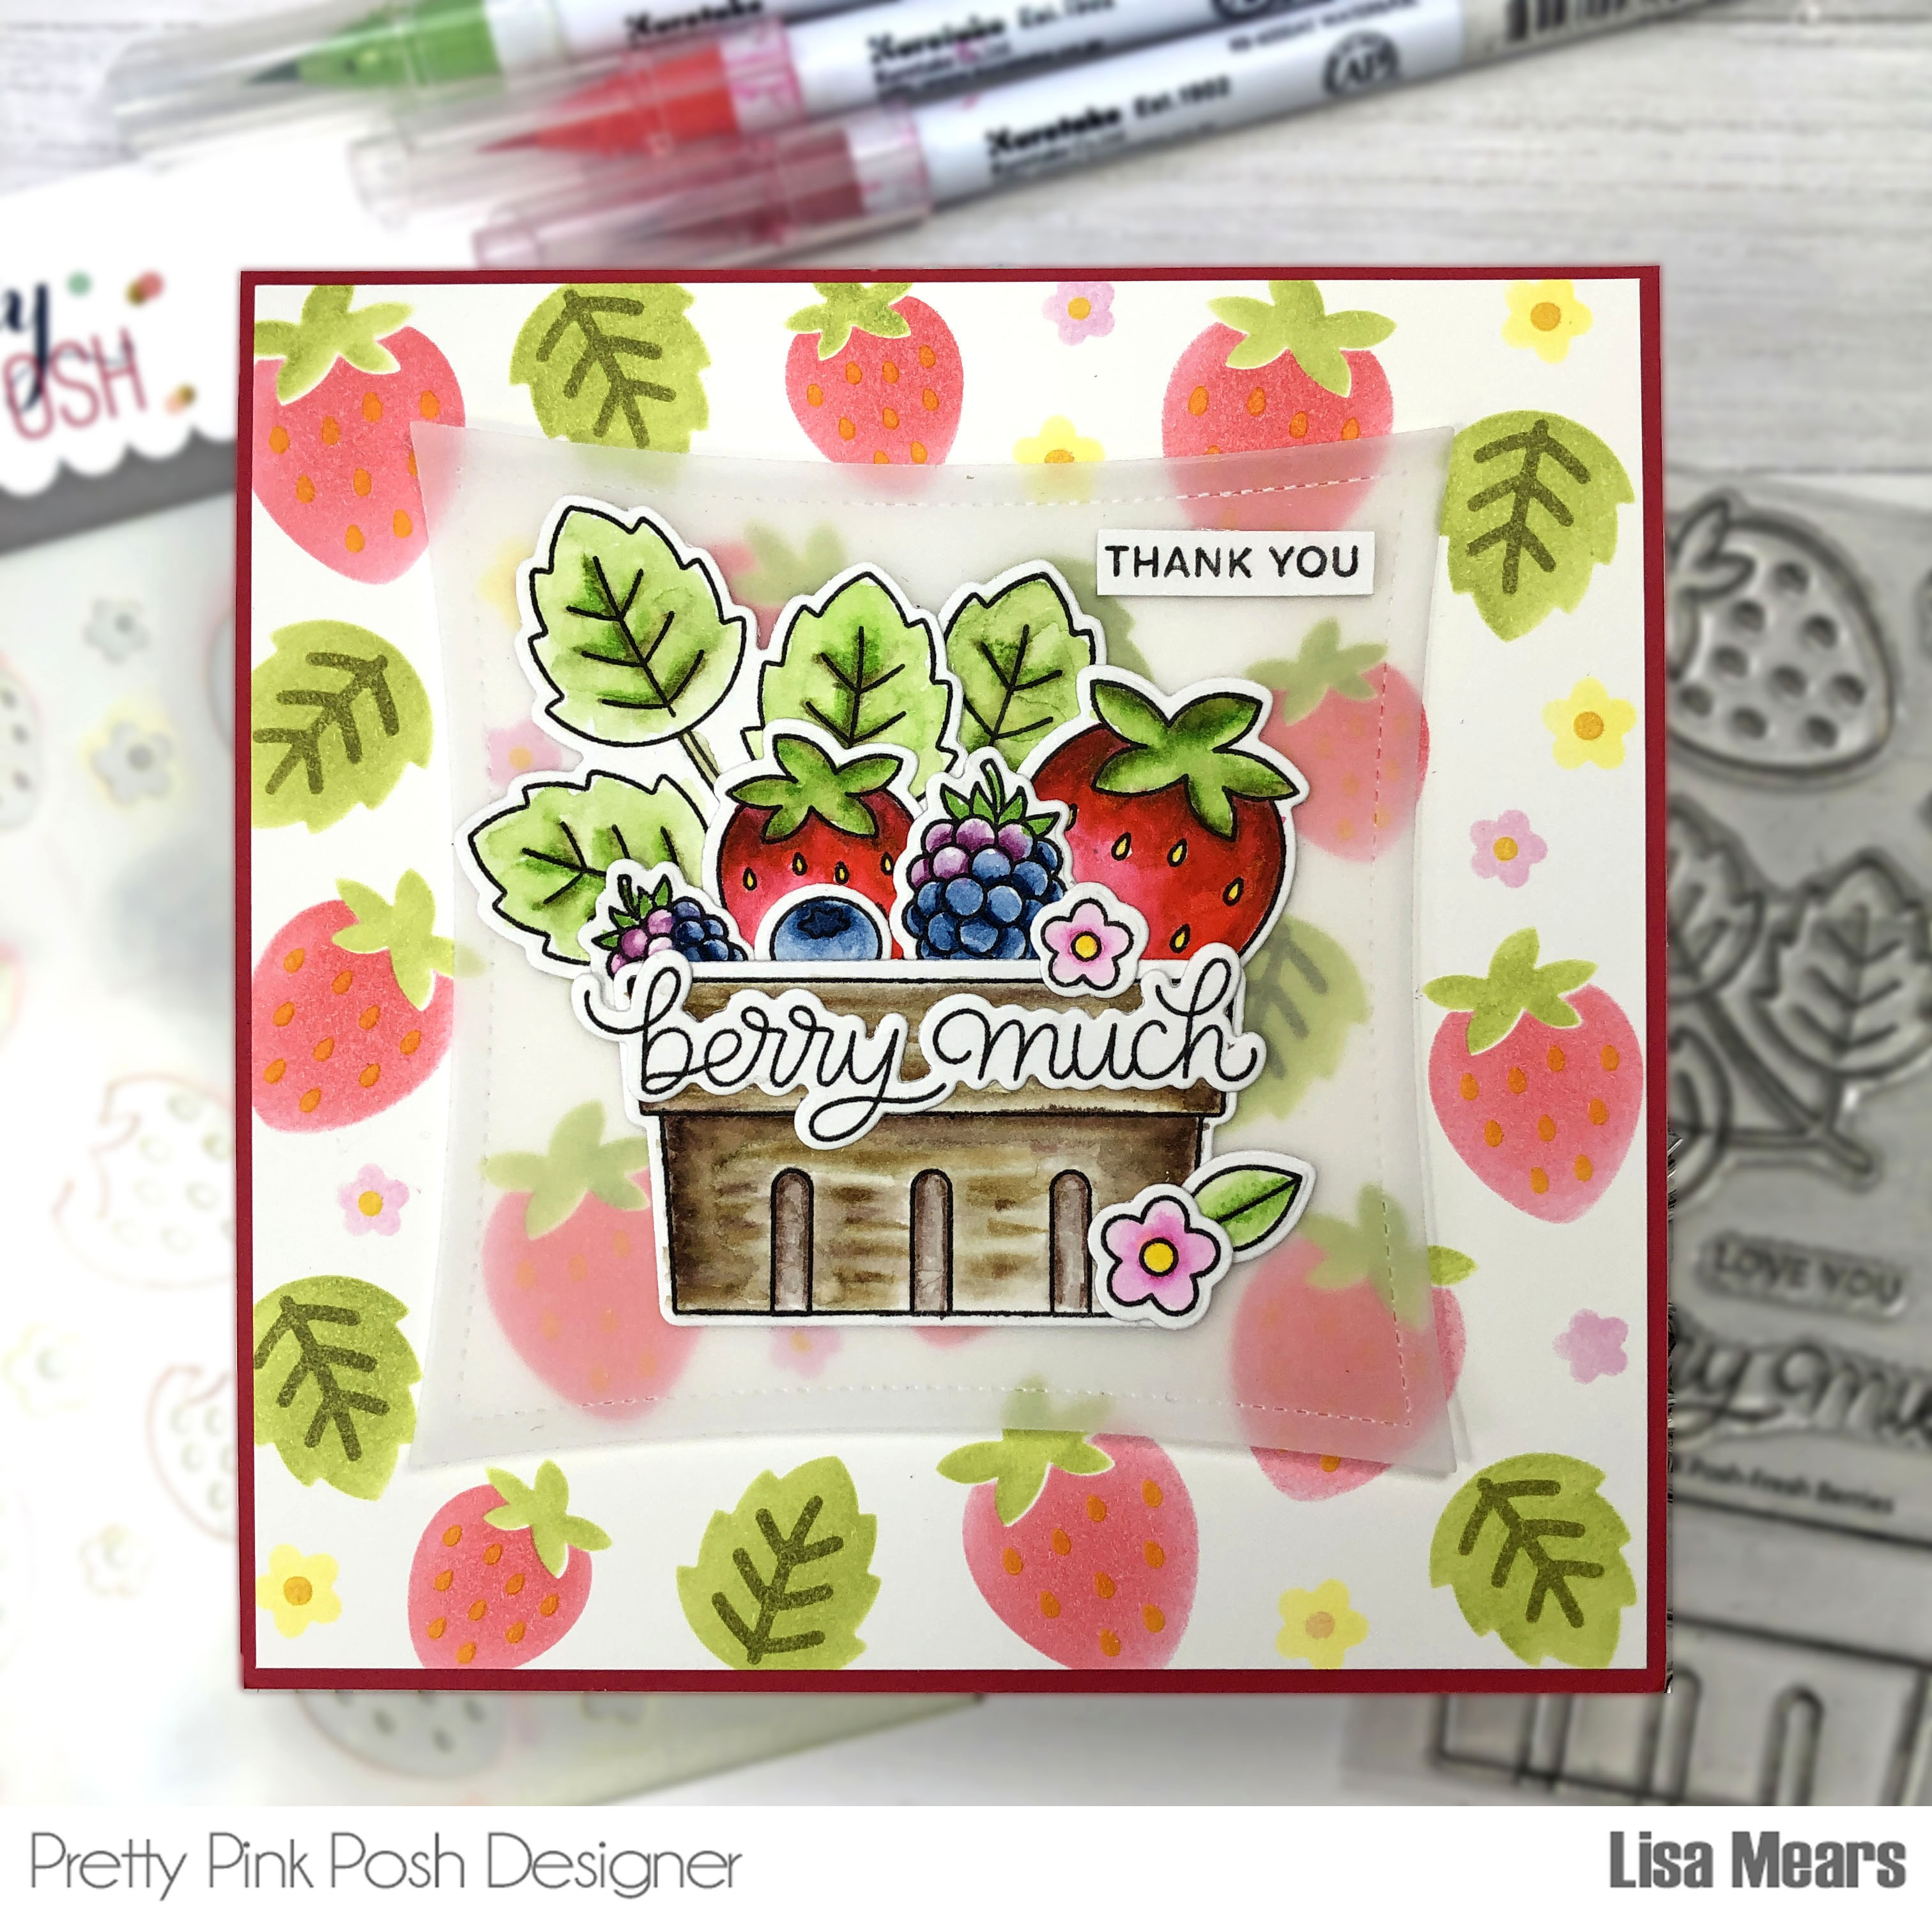
Card 1
For the background of my card, I used the Pretty Pink Posh Layered Strawberries Stencil and inked it with the following inks:
Layer A – Scrapbook.com Havana Red Hybrid Ink
Layer B – Scrapbook.com Succulent Hybrid Ink
Layer C – Scrapbook.com Olive Hybrid Ink
Layer D – For this layer, I mixed Pink and Main’s Water Gems Sparkling Watercolors in the color Sunny with Ranger Texture Paste to create the yellow raised areas of the flowers and strawberries.

After stenciling, I cut the layer to 5 3/8″ x 5 3/8″. I added a piece of red cardstock under the stenciled background to bring out the red color from the stencil.

I stamped the Pretty Pink Posh Fresh Berries stamp set onto Bristol Smooth Cardstock and colored the images with Zig Clean Color Real Brush Pens as follows:
Strawberries: Deep Red, Red, Blender, Yellow
Blueberry: Peacock Blue, Blender
Blackberries: Peacock Blue, Light Red Grape, Blender
Leaves: Olive Green, Light Green, Blender
Flowers: Peach Pink, Blender, Yellow
Basket: Deep Brown, Dark Oatmeal, Blender

I used the largest die from the Pretty Pink Posh Wonky Stitched Square dies and die cut it from vellum. I added the vellum to the strawberry stenciled background and arranged the fruit basket on top.
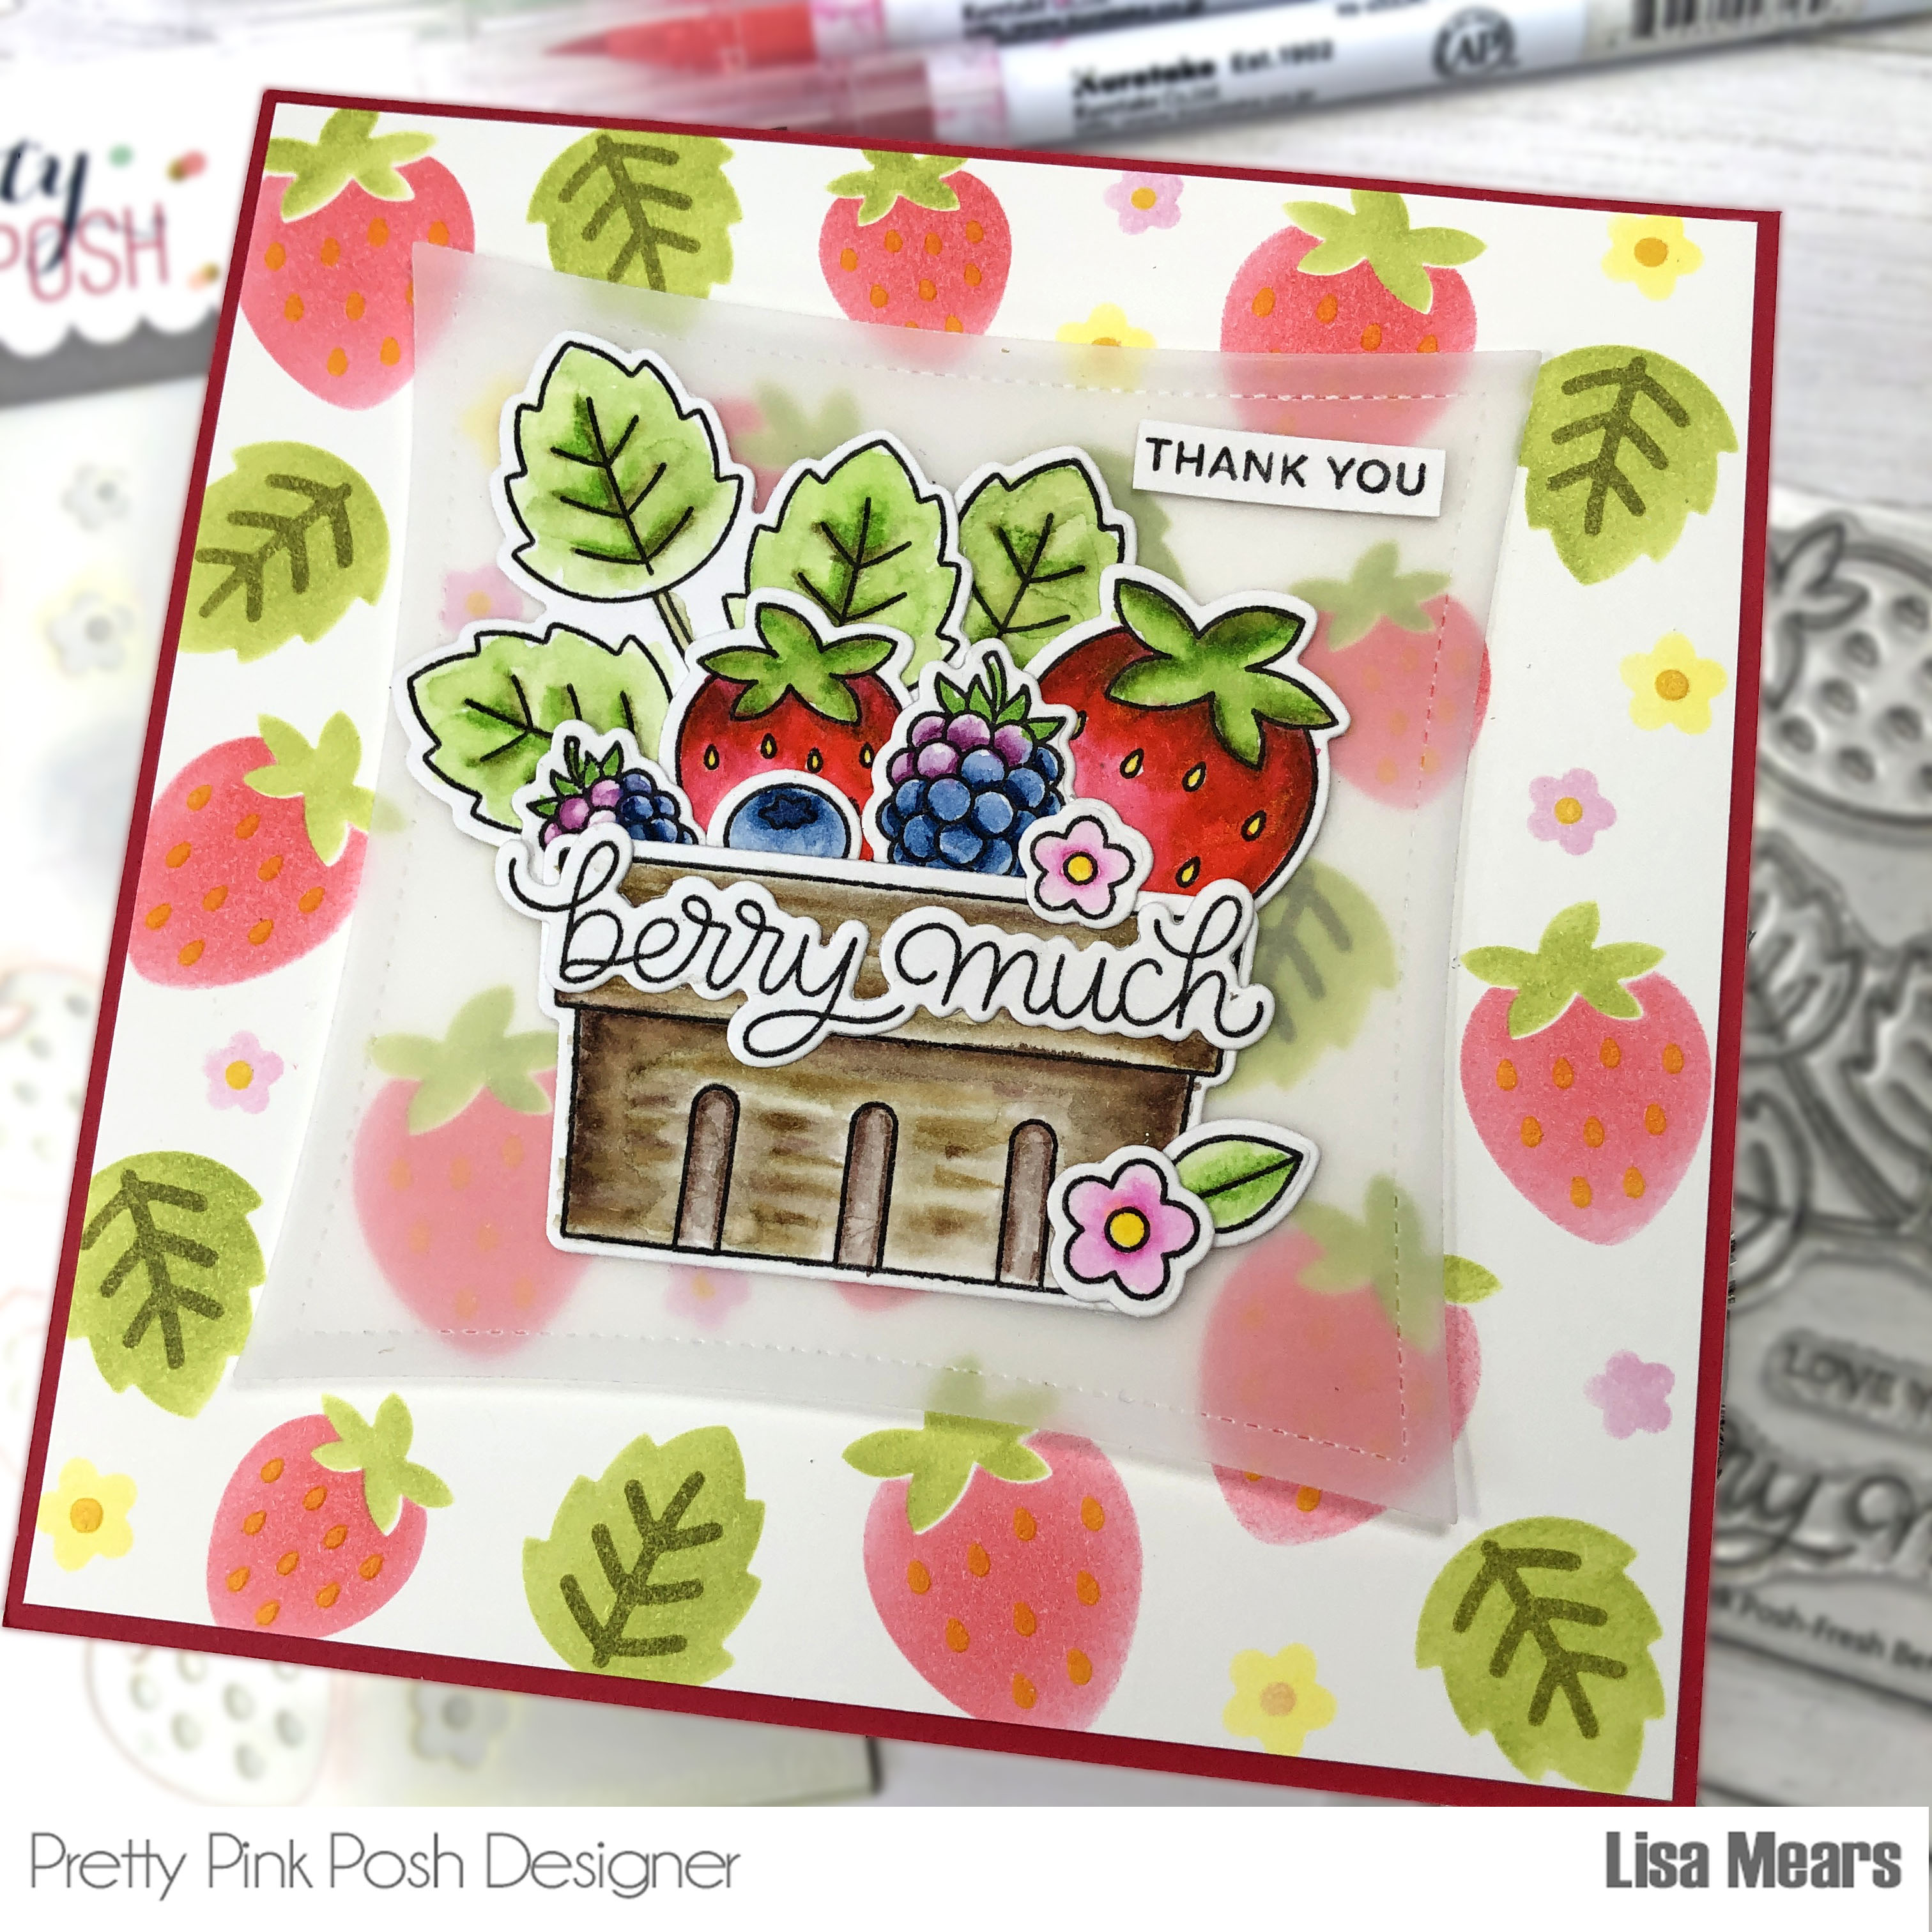
The card layers were added to a card base that measures 5 1/2″ x 5 1/2″.
Products Featured:
- Pretty Pink Posh Layered Strawberries Stencil
- Pretty Pink Posh Fresh Berries Stamp Set and Coordinating Dies
- Pretty Pink Posh Wonky Stitched Squares
- Scrapbookcom Inks Havana Red, Succulent, Olive
- Pink and Main Water Gems Sparkling Watercolors
- Ranger Transparent Texture Paste
- Bristol Smooth Cardstock
- Lawn Fawn Vellum
- Zig Clean Color Real Brush Pens
- The Maker Session Dauber Wand
- Scrapbookcom Ink Blending Tool
- Spellbinders Platinum Diecutting and Embossing Machine 8.5″ Platform
- Wendy Vecchi Make Art Stay-tion
- Bearly Art Precision Craft Glue
Card 2

For this card, I stamped the Pretty Pink Posh Fruit Salad stamp set onto Bristol Smooth Cardstock and colored the images with Zig Clean Color Real Brush Pens as follows:
Pineapple: Brown, Bright Yellow, Yellow/Leaves: Emerald Green, May Green
Banana: Yellow, Lemon Yellow
Pear: Light Green/Stem: Brown/Leaf: Emerald Green
Grapes: Red Grape, Light Red Grape/Stem: Brown/Leaf: Emerald Green, May Green
Peach: Bright Yellow, Flesh/Leaf: May Green

For the background of my card, I used the Pretty Pink Posh Starburst Stencil and inked it with the following inks: Scrapbook.com Daffodil ink and Scrapbook.com Orange Spice ink. After I inked it the first time, I rotated the stencil slightly so that the openings of the stencil were over the white area of the cardstock. I inked the stencil again. This added more inked lines in between the lines from the first set of inked lines.
I added a piece of green cardstock to the bottom of the stenciled layer, added the fruit to the Pretty Pink Fruit Bowl, and added a sentiment.
Products Featured:
- Pretty Pink Posh Fruit Salad Stamp Set and Coordinating Dies
- Pretty Pink Posh Fruit Bowl Dies
- Pretty Pink Posh Starburst Stencil
- Pretty Pink Posh Lemon Shimmer Mix
- Scrapbook.com Inks Daffodil, Orange Spice
- Scrapbook.com Foam Strips
- Bristol Smooth Cardstock
- Zig Clean Color Real Brush Pens
- Scrapbookcom Ink Blending Tool
- Spellbinders Platinum Diecutting and Embossing Machine 8.5″ Platform
- Wendy Vecchi Make Art Stay-tion
- Bearly Art Precision Craft Glue
Once again, if you would like to see. how I made these cards, watch my video. on YouTube or below.
Thank you so much for stopping by today. Have a sweet day!
Follow me for more inspiration:
- Blog – https://lisamearsdesigns.com/
- Instagram – LisaMearsDesigns
- Facebook – Lisa Mears Designs
- Pinterest – https://www.pinterest.com/lisamearsdesigns/
- You Tube – https://www.youtube.com/c/LisaMearsDesigns
- Etsy – https://www.etsy.com/shop/LisaMearsDesigns
