

Hi Crafty Friends!
I had so much fun teaching at the Scrapbook.com SBC Fest 2022! There were so many amazing instructors teaching classes during the SBC Fest two-day virtual event. If you missed it, don’t worry. You can view all of the SBC FEST videos here — CLICK HERE
During my session, I taught a class demonstrating how to use how to use nesting dies to make shaker cards. I demonstrated how to use basic shapes such as rectangles and circles to make shaker cards and I also demonstrated how to use not so basic shapes to make shaker cards. I made three shaker cards in my video and I’m sharing them in this post.


You can view my instructional video here. (Once on the page, simply scroll down to Day 2 to find my name which will link directly to my video.)
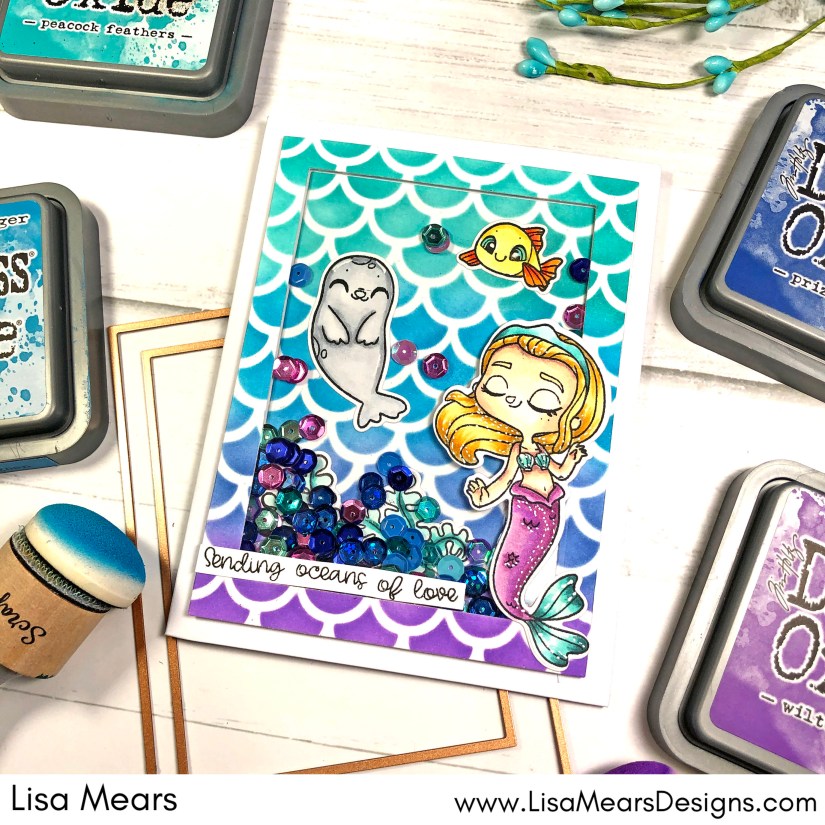
The first way, and probably the most common way, to make a shaker card from nesting dies is to die cut a frame. To do this, simply take two nesting dies, one slightly larger than the other, and layer them together. This will give you a frame. You can do this with nesting dies of any shape — rectangles, circles, squares, just to name a few.
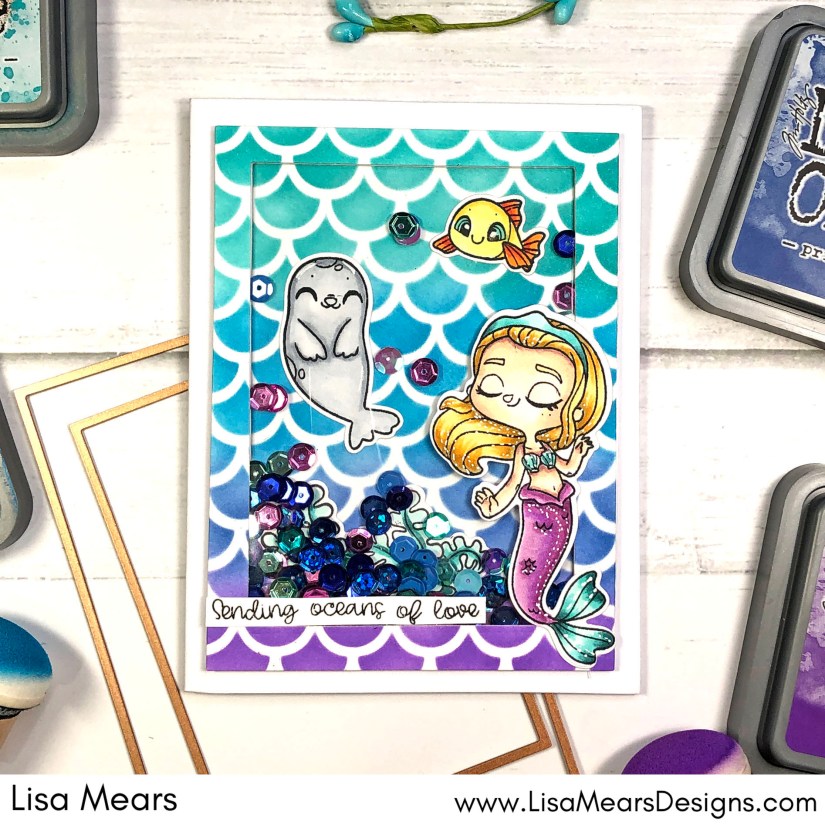
For this card, I stenciled a piece of cardstock and then used the Spellbinders Precision Layering Dies and die cut the second largest die and third largest die to create the frame. After diecutting the frame, I added a piece of acetate to the back. Next, I added double-sided adhesive foam tape to the back of the frame. Finally, add the shaker pieces to the top of the card base, added the frame on top, and added my stamped images. The stamped images are from Pink and Main’s Be a Mermaid stamp set.
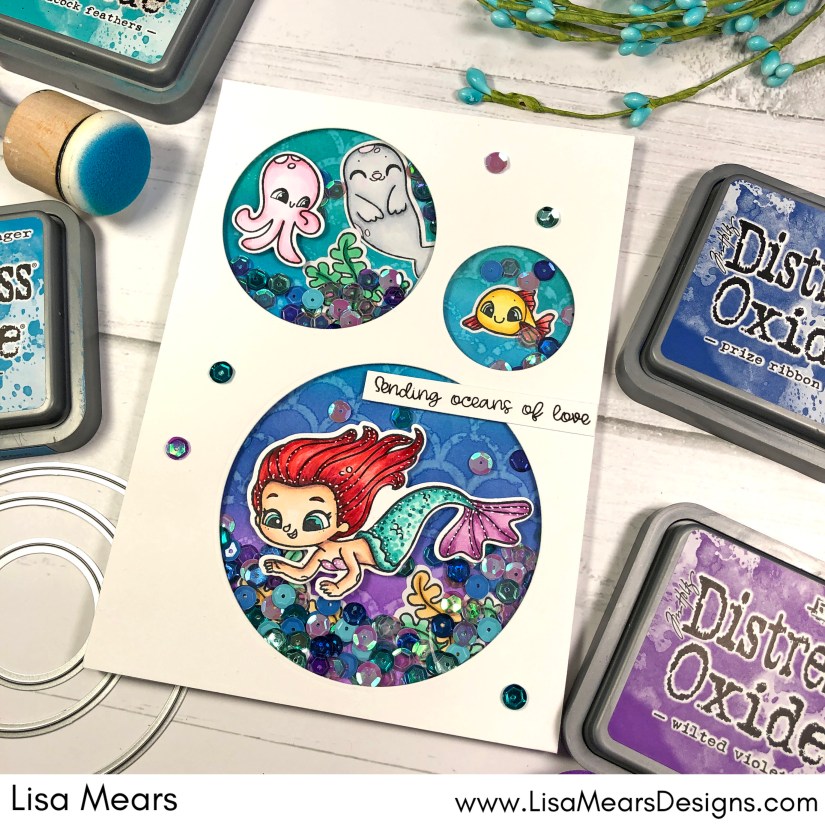
The second way to use nesting dies to make shaker cards is to die cut the nesting dies out of the top layer of your card panel.

For this card, I cut a card panel to 5″ x 7″. I placed three Scrapbook.com Nested Circle dies on top of the card panel. Next, I adhered the dies to the panel with Scrapbook.com Mint Tape so they wouldn’t move when diecutting. Next, added a piece of acetate to the back of the card panel and then add double-sided adhesive foam to the back, making sure to add the foam around all of the circles and edges of the card panel.
Next, I added a stenciled background to a piece of cardstock that measures 5″ x 7″. I added stamped images and sequins to the stenciled background. Finally, I added the top panel to the stenciled panel and then added it to a 5″ x 7″ card base.
For my next card, I made a shaker card with the shaker element being a not-so-basic shape. I used the Scrapbook.com Nested Fancy Circle Border Dies. Since the die that I used has scallops around it, I knew it would be very difficult to add foam to the back to build up the walls of the shaker. Therefore, for this card, I stacked the decorative circle die cuts to build the walls of the shaker element.
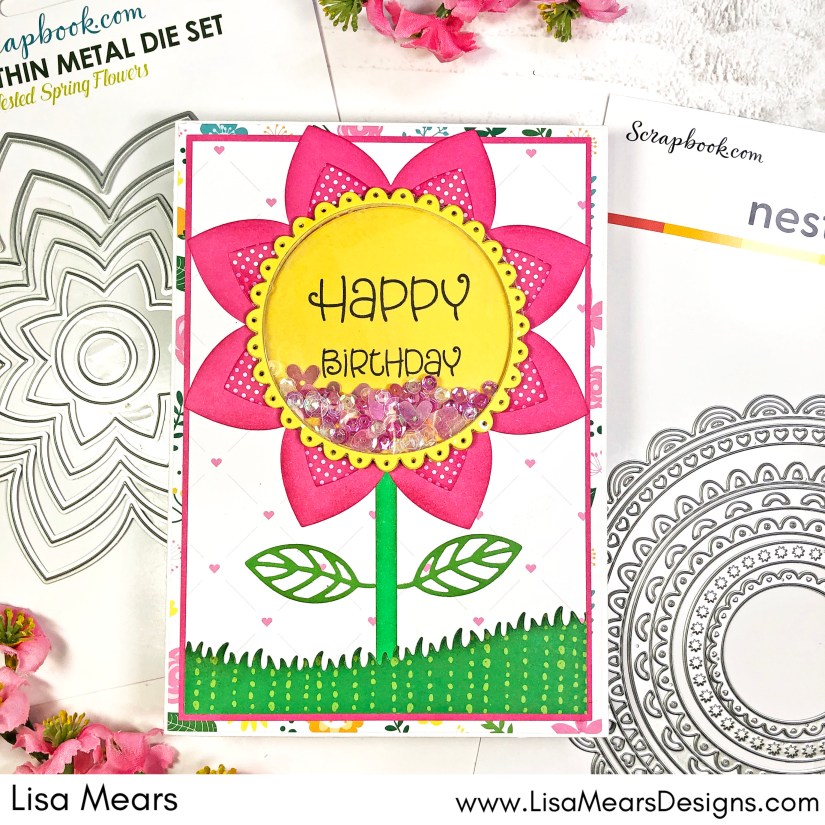
You can die cut as many pieces of cardstock you need to build up the walls of your shaker element. The height of your shaker element depends upon how thick the shaker pieces are. If you have thicker shaker pieces, you will want more layers of cardstock. If you have thinner shaker pieces, you will want to use less layers of cardstock.

For my card, I die cut the fifth largest decorative circle seven times. I glued six of the decorative circles together to create the shaker element. Next, I glued acetate to the top of the stack of decorative circles and then added the seventh circle to the top. The seventh circle is used to cover the acetate piece.

If you would like to see how I made these cards, be sure to check out my video from Scrapbook.com SBC Fest! You can find that video by clicking HERE and all of my supplies down below.
Thank you for stopping by today! Happy crafting!
Lisa
SUPPLIES USED:
Dies:
—Spellbinders – Precision Layering Basics A2 – Set A
—Scrapbook.com Nested Spring Flowers
—Scrapbook.com Nested Fancy Circle Borders
—Scrapbook.com Nested Circles
—Sunny Studio Stamps Slimline Nature Borders
—Sunny Studio Stamps Spring Greenery
—Pink and Main – Be a Mermaid Dies
Stamps:
—Scrapbook.com Cheerful Sentiments
—Pink and Main – Be a Mermaid
Paper:
—Neenah Solar White Cardstock
—Scrapbook.com Rainbow Smooth Cardstock Paper Pad 6” x 8”
—Scrapbook.com Rainbow Pattern Paper Pad 6” x 8”
—Scrapbook.com Sherbet Smooth Cardstock Paper Pad 6” x 8”
—Scrapbook.com Sherbet Pattern Paper Pad 6” x 8”
Stencil:
—Scrapbook.com Scallop Stencil
Ink:
—Scrapbook.com Premium Hybrid Ink Pad – Black
—Scrapbook.com Premium Hybrid Ink Pad – Confetti Pink
—Scrapbook.com Premium Hybrid Ink Pad – Olive
—Ranger Distress Oxide Ink Pad – Peacock Feathers
—Ranger Distress Oxide Ink Pad – Mermaid Lagoon
—Ranger Distress Oxide Ink Pad – Prize Ribbon
—Ranger Distress Oxide Ink Pad – Wilted Violet
Adhesive:
—Therm O Web Pixie Spray
—Scrapbook.com Double Sided Adhesive Foam Sheets 4.25” x 5.5”
—Scrapbook.com Mint Tape
—Nuvo – Deluxe Adhesive
Sequins:
—Craft Medley Cup Sequins – Viola
—Craft Medley Cup Sequins – Rhythm N Blues
—28 Lilac Lane Premium Sequins Think Pink
Tools/Other:
—We R Memory Keepers 12” x 12” Clear Acetate
—Scrapbook.com Ink Blending Tool with Domed Foam Applicator
—Sizzix Stencil and Stamp Tool
—Pink and Main Magic Anti-static Brush
—Scrapbook.com Scissors – 5-inch
Follow me for more inspiration:
- Blog – https://lisamearscarddesigns.com/
- Instagram – LisaMearsDesigns
- Facebook – Lisa Mears Designs
- Pinterest – https://www.pinterest.com/lisamearsdesigns/
- You Tube – https://www.youtube.com/c/LisaMearsDesigns
- Etsy – https://www.etsy.com/shop/LisaMearsCardDesigns
The links above are affiliate links which mean that I get a small commission of any sales at NO extra cost to you. Using my links helps me be able to bring in more content to show you on my channel. I appreciate your support! Thank you!
