

Hello crafty friends.
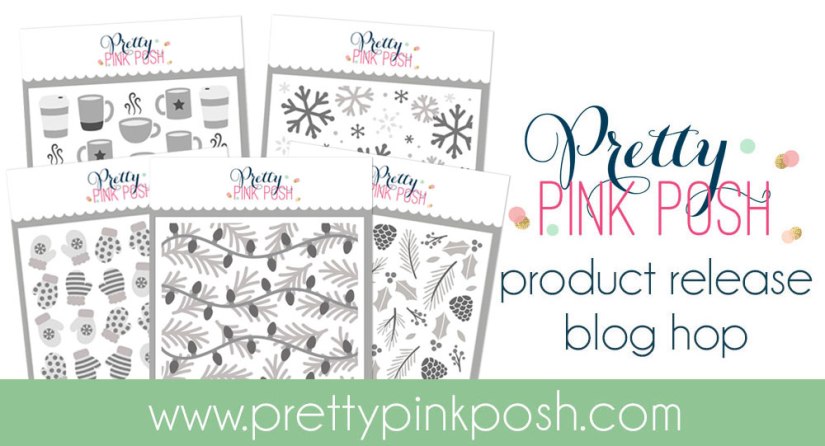
I’m so excited to be joining Pretty Pink Posh to celebrate their holiday release. This release is all about Christmas and the winter season. To celebrate their release, Pretty Pink Posh is having a blog hop where you have a chance to win one of three $30 gift certificates to the Pretty Pink Posh shop.
Be sure to read all the way to the end of this post to find out more about the blog hop, see some of the cards I made with this release, and find links to all of the supplies I used to make my cards.
If you would like to see the entire release, you can watch my video below or on YouTube.
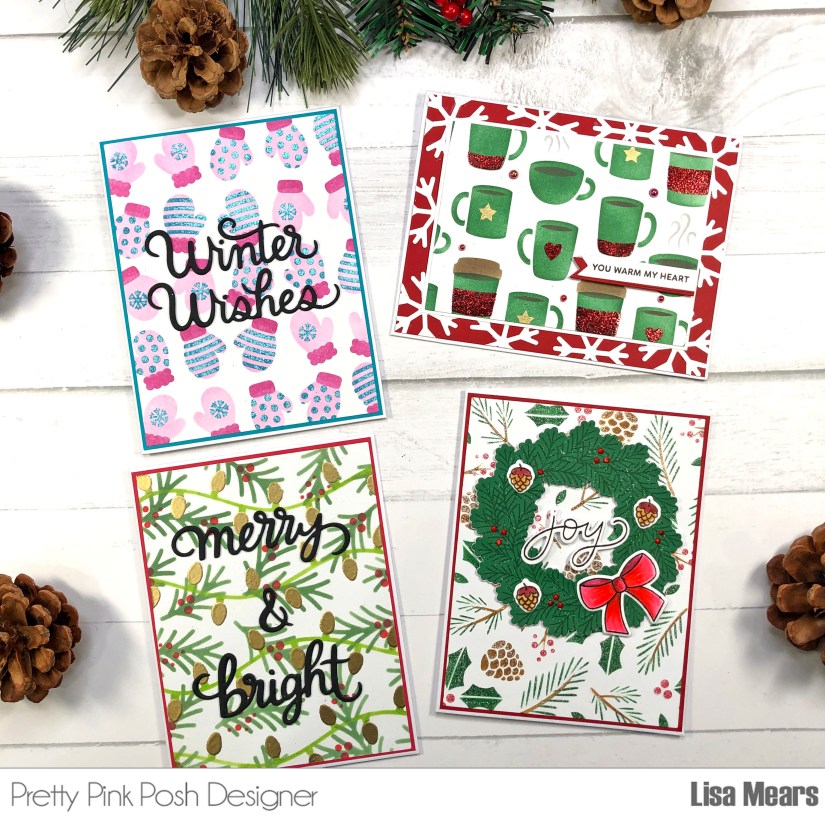
For the blog hop, I’m sharing four cards that I made with some of the new products from Pretty Pink Posh’s new release. For my cards, I use some stepped-up stenciling techniques to add glitter and shine to my stenciled cards.
 If you would like to see how I made all of my cards, be sure to check out my video below or on YouTube.
Card 1
For my first card, I used the Layered Coffee Cups stencil. For Layer A, I used Scrapbook.com Pine ink. For Layer B, I added Ground Espresso Distress Oxide ink to everything except for the coffee cup sleeve. I added Versamark ink for the coffee cup sleeve and then I sprinkle red embossing powder over the sleeves of the coffee cups and heat set them.
For Layer C, I inked the coffee steam with Scrapbook.com Fog ink. Next, I added Versarmark ink to the hearts and bottom of the coffee mugs. I use red embossing powder to cover these areas and then heat set them. Next, I reapplied stencil Layer C, adding Versamark ink to the stars. I used Brutus Monroe Gilded embossing powder and heat set it. I just love the look of the embossing powder on the stenciled background. It adds such a pretty shine to the stenciled background.

I used a rectangle die to cut the coffee cup background and added it to a piece of white cardstock.
Using the snowflake die from the Mitten Shaker die set, I die cut 10 white snowflakes and glued them around the outside edge of a piece of red cardstock. I added the coffee cup layer to the top of the red snowflake paper.
I stamped a sentiment from the Holiday Sentiments stamp set and cut it out with a banner die from the Holiday Envelopes die set. I layered the white banner onto a red banner and offset it.
I added some Ruby Red Pearls to my card. My finished card is an A2 size card which measures 4 1/4″ x 5 1/2″.

If you want to see how I made this card, watch my video on YouTube.
Products Featured:
- Pretty Pink Posh Layered Coffee Cups Stencil
- Pretty Pink Posh Holiday Sentiments Stamp Set
- Pretty Pink Posh Holiday Envelopes Coordinating Dies
- Pretty Pink Posh Mitten Shaker Die Set (snowflakes)
- Pretty Pink Posh Ruby Red Pearls
- Inks: Scrapbook.com Pine, Scrapbook.com Fog, Ground Espresso Distress Oxide, Versamark, Versafine Onyx Black Ink (sentiment)
- Embossing Powder: Red (from stash) and Brutus Monroe Gilded Embossing Powder
- Spellbinders A2 Precision Layering Dies
- Mono Sand Eraser
Card 2
For my second card, I used the Layered Winter Foliage stencil. I used the following inks:
Layer A: Scrapbook.com Gingerbread ink
Layer B: Scrapbook.com Pine ink
Layer C: Scrapbook.com Cardinal Red ink

After I inked all layers of the stencil, I added each stencil layer back on top of my cardstock and added Brutus Monroe Alabaster Glitter Glaze to each stencil layer. After applying the glitter glaze to each layer, I set it aside to fully dry before reapplying the glitter glaze to the next stencil layer. The glitter glaze adds so much sparkle to the stenciled background. It even resembles snow sitting on top of the leaves and pinecones.
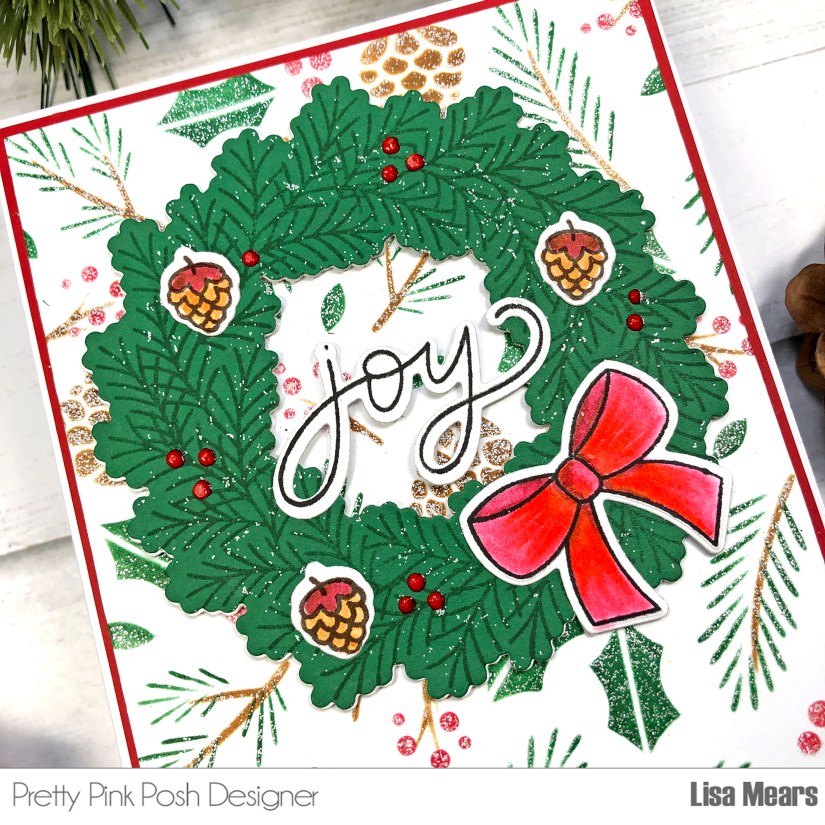
I used a rectangle die to cut the stenciled background and added it to a piece of red cardstock. I stamped the Pine Wreath Stamp in Scrapbook.com Pine ink onto green cardstock and die cut it with the coordinating dies. I brushed some Brutus Monroe Alabaster Glitter Glaze all over the wreath. I added the Pine Wreath Stamp Set to the top of the card along with some acorns and a bow. I added the word Joy to the wreath. I used the Scrapbook.com Pops of Color in Rudolph Red to add berries to the wreath.

I love all of the glitter and sparkle added to the stencil and wreath.
If you want to see how I made this card, click here to watch the video on YouTube.
Products Featured:
- Pretty Pink Posh Layered Winter Foliage Stencil
- Pretty Pink Posh Pine Wreath Stamp Set and Coordinating Dies
- Inks: Scrapbook.com Gingerbread, Scrapbook.com Pine, Scrapbook.com Cardinal Red
- Brutus Monroe Alabaster Glitter Glaze
- Palette Knife
- Scrapbook.com Rudolph Red Pops of Color
- Spellbinders A2 Precision Layering Dies
- Zig Clean Color Real Brush Markers – Colored Used: Mustard, Brown, Deep Red, Red, Blender
Card 3
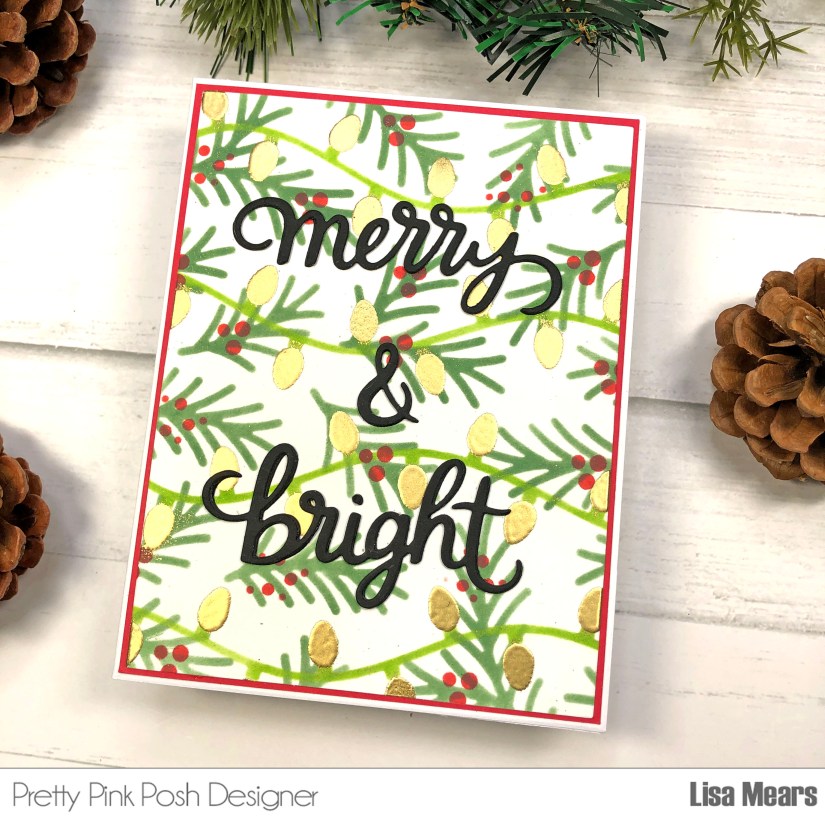
For my next card, I used the Layered Christmas Lights Stencil. I used the following inks:
Layer A (pine leaves): Rustic Wilderness Distress Oxide ink
Layer B (the string for the lights): Mowed Lawn Distress Oxide ink
Layer C (the Christmas lights): Versamark ink and then added Brutus Monroe Gilded Embossing Powder over the top.
I heat set the embossing powder. Next, I used Layer C stencil from the Layered Winter Foliage Stencil set to add the berries to the background. I used Candied Apple Distress Oxide ink for the berries.

I used a rectangle die to die cut the stenciled background and then added it to a piece of red cardstock. I added the Merry and Bright Script words to the top. My completed card measures 4 1/4″ x 5 1/2″.
If you want to see how I made this card, click here to watch the video on YouTube.
Products Featured:
- Pretty Pink Posh Layered Christmas Lights Stencil
- Pretty Pink Posh Merry & Bright Script word die
- Pretty Pink Posh Layered Winter Foliage Stencil
- Ink: Rustic Wilderness Distress Oxide ink, Mowed Lawn Distress Oxide ink, Versamark ink, Candied Apple Distress Oxide ink
- Brutus Monroe Gilded Embossing Powder
- Spellbinders A2 Precision Layering Dies
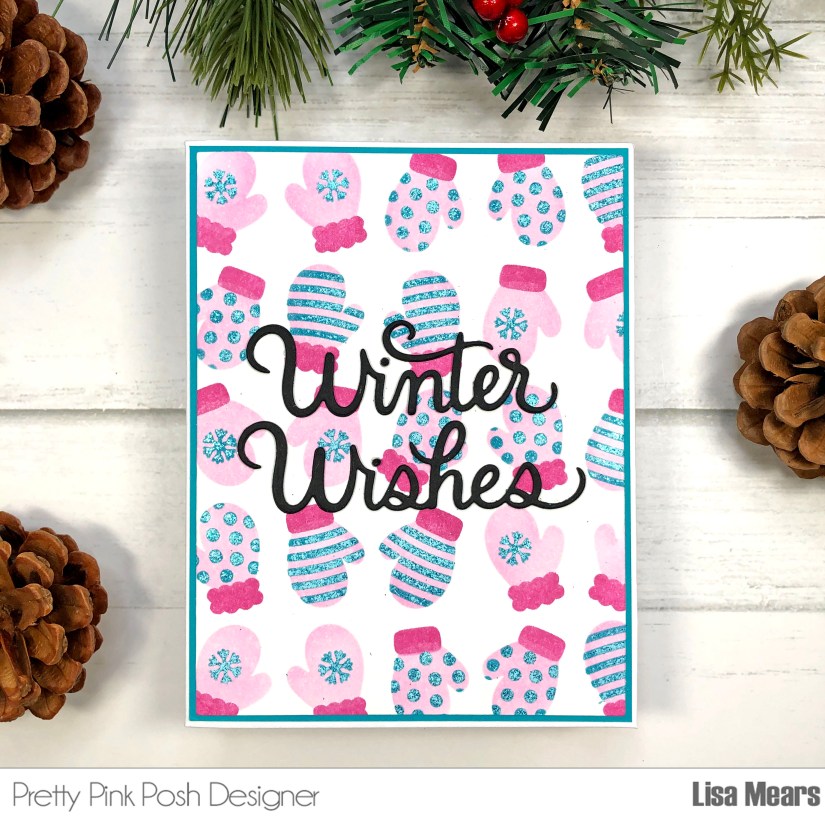
Card 4
For this card, I used the Layered Mittens Stencil. I used the following inks:
Layer A: Scrapbook.com Pink Flamingo ink
Layer B: Scrapbook.com Confetti Pink ink
Layer C: Scrapbook.com Mermaid ink and then Versamark ink
After applying the Versamark ink, I added Ranger Teal Tinsel Embossing Powder and then heat set it. 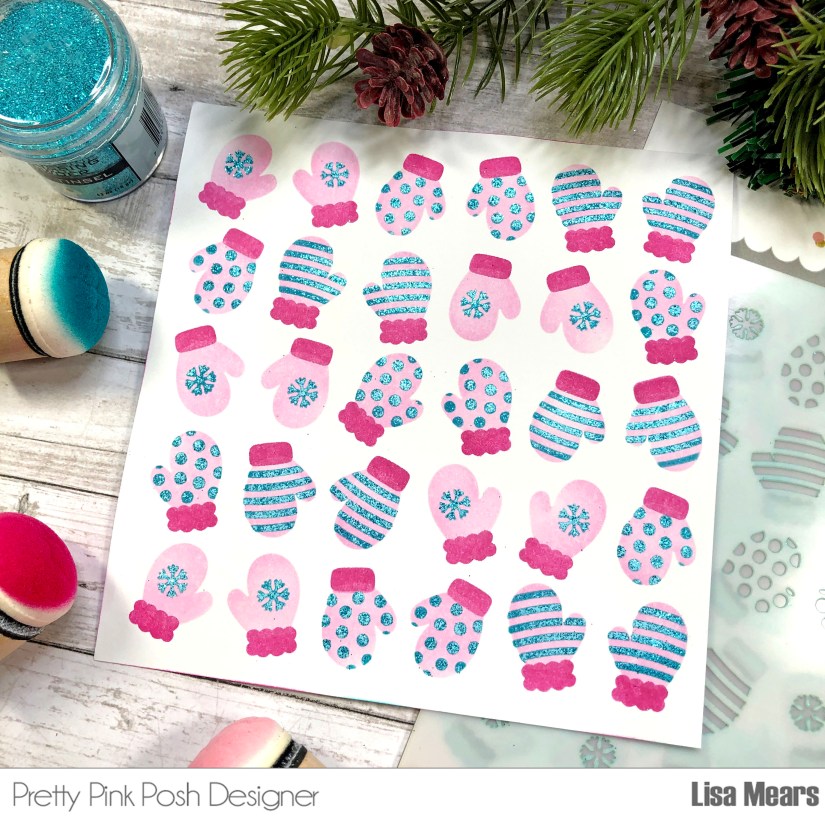
I cut the background using a rectangle die and added it to a piece of teal cardstock. I added the Warm Wishes Script word die to the top of the card. My completed card measures 4 1/4″ x 5 1/2″
Products Featured:
- Pretty Pink Posh Layered Mittens Stencil
- Pretty Pink Posh Winter Wishes Script word die
- Inks: Scrapbook.com Pink Flamingo, Scrapbook.com Confetti Pink, Scrapbook.com Mermaid, Versamark
- Ranger Teal Tinsel Embossing Powder
- Spellbinders A2 Precision Layering Die
Be sure to follow along in the Pretty Pink Posh Blog Hop where you have a chance to win one of three $30 gift certificates to the Pretty Pink Posh store. Winners will be picked randomly along the blog hop. Comments must be left by 11:59 PM PST on 10/24/2022. Winners will be announced on the PPP blog.
Below are blog links for the other blog hop participants.
Pretty Pink Posh blog
Rachel Alvarado
Wanda Guess
Jeanne Jachna
Melody Rupple
Yoonsun Hur
Lisa Mears — YOU ARE HERE
Stefanie Loh
Thank you so much for stopping by today. Have a wonderful day!
Follow me for more inspiration:
- Blog – https://lisamearsdesigns.com/
- Instagram – LisaMearsDesigns
- Facebook – Lisa Mears Designs
- Pinterest – https://www.pinterest.com/lisamearsdesigns/
- You Tube – https://www.youtube.com/c/LisaMearsDesigns
- Etsy – https://www.etsy.com/shop/LisaMearsCardDesigns

I LOVE your stenciling! Especially the mittens!
LikeLiked by 1 person
your cards are wonderful!
LikeLiked by 1 person
Thank you!
LikeLike
Oh My Goodness! I love your adorable cards!
LikeLiked by 1 person
Thank you!
LikeLike
I love all of your cards, especially the coffee one! Adding embossing powder to the stencil layers really looks wonderful!
LikeLiked by 2 people
I love these cards so much. This release is amazing
LikeLiked by 1 person
It’s getting harder for me to resist that mitten stencil, I tell ya! 🙂 Thanks for sharing.
LikeLiked by 1 person
Wow, these are superb!! So sparkly and beautiful! TFS –
Lori S in PA
LikeLiked by 1 person
Love all of your cards but the mittens card is my favorite.
Thanks for the step by step clear instructions in your video, and for the inspiration!
LikeLiked by 1 person
Beautiful card designs! So fresh and joyful!
LikeLiked by 1 person
Thank you Gayle
LikeLike
Fabulously Fun cards and colors!
LikeLiked by 1 person
I love the added glitter paste on your cards! The mitten card is so cute! Thanks for the videos!
LikeLiked by 1 person
I like the added glitter, too cute!
LikeLiked by 1 person
Love your stenciling!
LikeLiked by 1 person
I LOVE YOUR STENCILED CARDS. Layering dies make it so much easier to make special backgrounds. I just love them. And these are extra special. The mittens, the adorable mugs…the vegetation. I love these all so much!
LikeLiked by 1 person
Thank you Sharon
LikeLike
I love your use of the layered stencils…especially the mittens and winter drinks!
LikeLiked by 1 person
So many cards!!! Beautiful!!
LikeLiked by 1 person
Thank you Tanna
LikeLike
Adorable cards!
LikeLiked by 1 person
Thank you Kelly
LikeLike
Lovely cards!
LikeLiked by 1 person
Thank you Brenda
LikeLike
Those stencils are wonderful! and so is your work!
LikeLiked by 1 person
Thank you Barbara
LikeLike
Beautiful cards! Thank you for sharing!
LikeLiked by 1 person
Thank you Gail
LikeLike
I am so in love with these stencils, especially the winter foliage and the snowflakes! They all make beautiful cards!
LikeLiked by 1 person
You really showed off all these stencils beautifully! I just love them all.
LikeLiked by 1 person
Thank you Amy
LikeLike
So beautiful!
LikeLiked by 1 person
Thank you Marisela
LikeLike
Great color combos on these stenciled designs, and I love the pretty wreath! Awesome cards!
LikeLiked by 1 person
Thank you Denise
LikeLike
Wonderful variety of colorful stenciled cards.
LikeLiked by 2 people
Everything is gorgeous and I so appreciate the videos–thank you.
LikeLiked by 2 people
Thank you Isabel
LikeLike
I love the coffee mug colors.just beautiful.
LikeLiked by 1 person
love these stencils, what fun!
LikeLiked by 1 person
Love the stenciled background.
Great coloring and fun ideas.
thanks for sharing
txmlhl(at)yahoo(dot)com
LikeLiked by 1 person
Great projects and a great video.
LikeLiked by 1 person
Thank you Kathy
LikeLike
Awesome assortment, so much inspiration. TFS
LikeLiked by 1 person
Fabulous cards! Love the glittery details.
LikeLiked by 1 person
Thank you Laurie
LikeLike
Love them all!!
LikeLiked by 1 person
Thank you Rita!
LikeLike
Hi Lisa! Marvelous stenciled cards! Especially love the glittered coffee cups!
LikeLiked by 1 person
Thank you Ann!
LikeLike
The layered stencils are just stunningly beautiful! Love them so much! Wish i could get one!
LikeLiked by 1 person
I love all of these sparkly cards! Thanks for the video!
LikeLiked by 1 person
Thank you Lucy!
LikeLike
Love the sparkly goodness! So pretty.
LikeLiked by 1 person
Thank you Joy!
LikeLike
Beautiful cards… love the merry and bright card
LikeLiked by 1 person
Thank you!
LikeLike
Love your cards! The stenciling is so pretty and cheerful!
LikeLiked by 1 person
Thank you!
LikeLike
You did such a great job showcasing each layering stencil. Your directions are so clear, and those color choices are fantastic! I learn more about card making with every *hop*…thank you!
LikeLiked by 1 person
Fun stenciled cards!
LikeLiked by 1 person
Such wonderful Holiday cards! Great colors and designs.
LikeLiked by 1 person
Thank you!
LikeLike
Beautiful stenciling! Your cards are so pretty!
LikeLiked by 1 person
Thank you Debbie
LikeLike
Hi Lisa 🙂 What a delightful variety of cards you’ve brought us!!! I love your directions so well written! Such joyous cards! Thanks for inspiring me 🙂
LikeLiked by 1 person
Thank you Connie. So glad you liked the cards.
LikeLike
I love all your cards. You used so many of the products and made incredible cards…. TFS
LikeLiked by 1 person
Thank you so much Virginia!
LikeLike
I love how used embossing powder or glitter to add sparkle to each card. My favorite is the coffee cups card.
LikeLiked by 1 person
Thank you Jenna
LikeLike
I wish I could own it ALL!!! Love the coffee cups and all the sparkle is making me swoon!!
LikeLiked by 1 person