

Hi Crafty Friends!
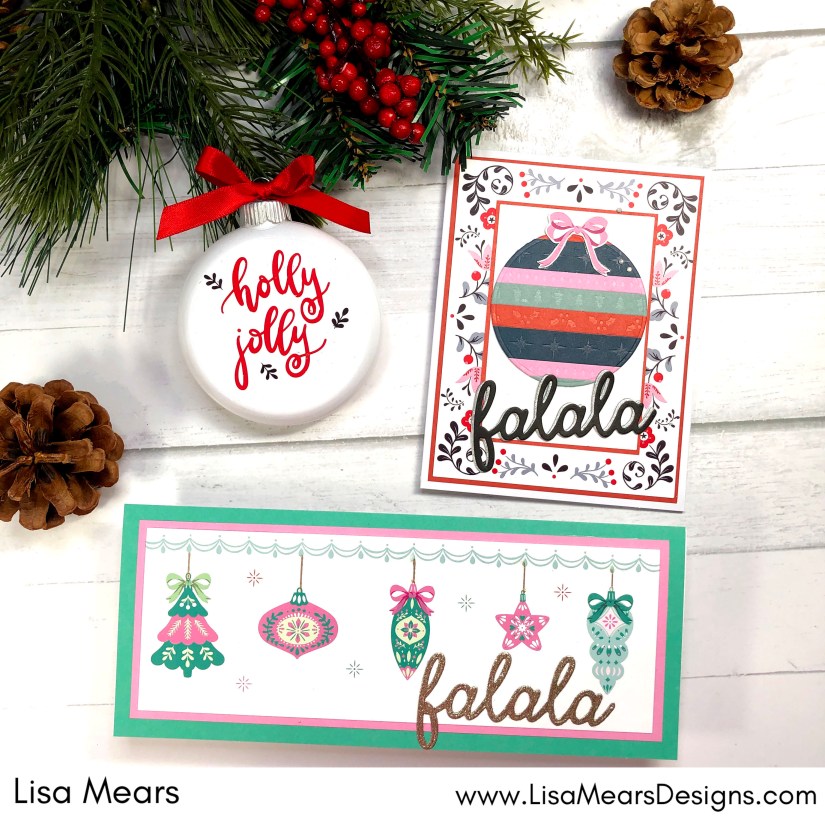
Today I am sharing four Christmas projects that I created using rub-on transfers. I made two cards, a Christmas ornament, and a mason jar.
 For my projects, I used the Christmas Essentials Bundle from Scrapbook.com. You can purchase the entire bundle by clicking HERE.
The Christmas Essentials Bundle includes all of the following items:


These products can also be purchased as standalone items. If you don’t want to purchase the bundle, click on the product name to purchase the individual product.
- Scrapbook.com Peppermint Holiday Rub On Transfers
- Scrapbook.com Decorative Emboss and Die Set Stitched Border Strips Christmas
- Scrapbook.com Peppermint Slimline Smooth Cardstock Paper Pad
- Scrapbook.com Decorative Die Mini FaLaLa
Watch my video on YouTube or below to see how I made my projects.
Project 1: Slimline Christmas Card

I made a slimline Christmas card for my first project. I cut a piece of white cardstock to 7 3/4″ x 2 3/4″ and added the rub-on horizontal border to the top of the cardstock. Next, I added five of the rub-on Christmas ornaments followed by the rub-on bows to the top of three of the ornaments. I added some rub-on snowflakes to fill up some of the white space on the card. I die cut the Fa la la word die from gold glitter cardstock from the Scrapbook.com Mixed Metals paper pad. I added the white cardstock layer to a piece of pink cardstock from the Scrapbook.com Peppermint slimline paper pad. I cut down the pink cardstock to 8″ x 3″. I added the pink cardstock to a piece of teal cardstock from the same paper pad. The teal cardstock measures 8 1/2″ x 3 1/2″.
Supplies
- Scrapbook.com Christmas Essentials Bundle
- Neenah Solar White Cardstock
- Scrapbook.com Mixed Metals Glitter Paper Pad
- Nuvo Deluxe Adhesive
- Spellbinders Platinum Diecutting and Embossing Machine 8.5″ Platform
- Sizzix Stamp and Stencil Tool
- Sizzix Sticky Grid Sheets
Project 2: DIY Christmas Ornament

For this project, I added the rub-ons to a blank white Christmas ornament that I picked up at my local craft store.
Supplies
- Scrapbook.com Christmas Essentials Bundle
- White Christmas Ornament
Project 3: DIY Mason Jar
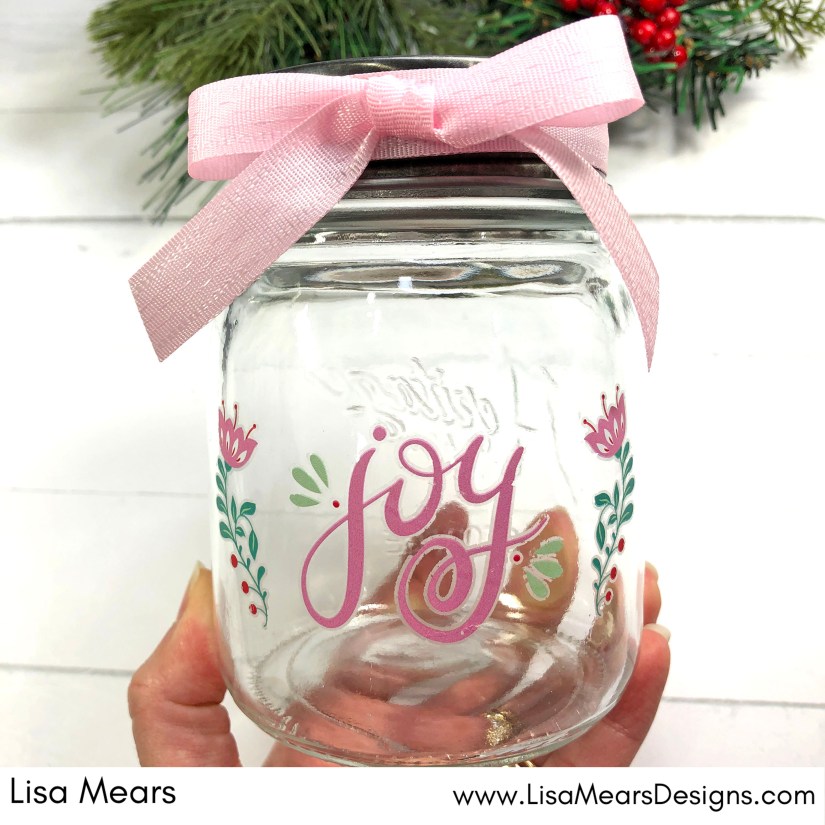
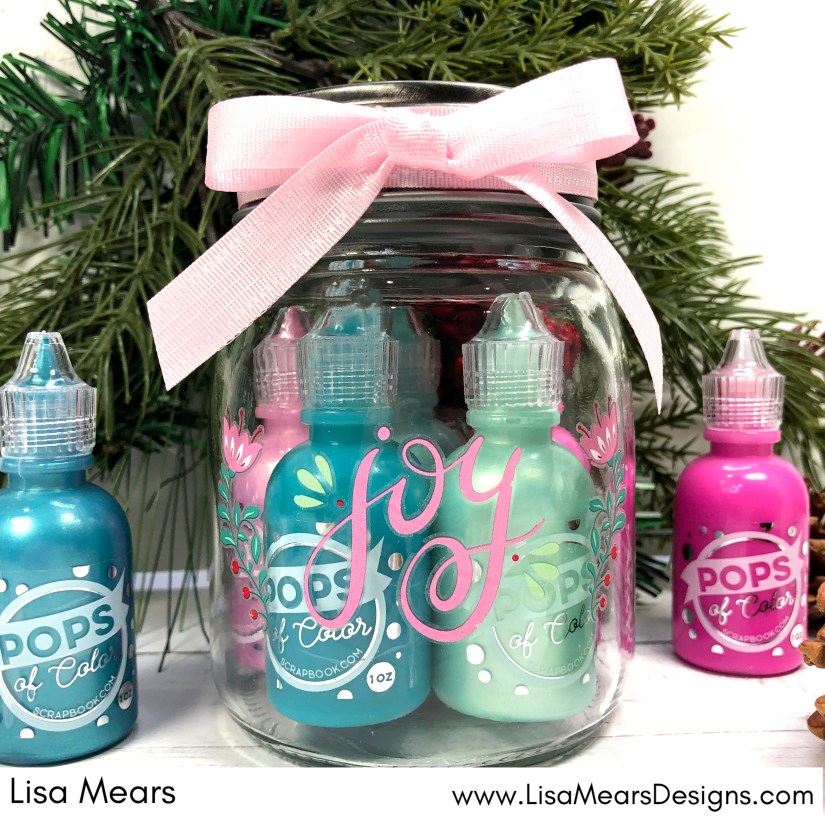
For this project, I added the rub-ons to the front of a clear mason jar. You can fill the mason jar with anything you want, but I added some of the Scrapbook.com Pops of Color inside which would make a nice gift for a crafty friend. This would make a great holiday gift.
Supplies:
Project 4: Christmas Card

For this A2 size card, I incorporated all of the products from the Christmas Essentials Bundle. One of the rub-on designs includes a rectangular flower border that fits perfectly on an A2 size card. I added that border to a piece of white cardstock that measures 3 7/8″ x 5 1/8″. The red layer of cardstock underneath the floral design measures 4″ x 5 1/4″.
The smaller cardstock layers measure as follows:
Red cardstock 2 5/8″ x 3 7/8″
White cardstock 2 1/2″ x 3 3/4″
I die cut several slimline strips using the Scrapbookcom Decorative Stitched Border Strips, glued them back-to-back on a piece of white cardstock and then die cut the strips with a circle die. I added the pink bow from the rub-on pack to a piece of white cardstock and then fussy cut it from the cardstock and added it to the top of the ornament.
I die cut the Fa la la word die from silver glitter cardstock and black cardstock and offset them so that a little bit of the silver glitter is peeking through.
Supplies:
- Scrapbook.com Christmas Essentials Bundle
- Neenah Solar White Cardstock
- Scrapbook.com Mixed Metals Glitter Paper Pad
- Scrapbookcom Peppermint Smooth Cardstock Paper Pad 6×8
- Scrapbookcom Christmas Smooth Cardstock Paper Pad 6×8
- Spellbinders Opal Gems
- Nuvo Deluxe Adhesive
- Spellbinders Platinum Diecutting and Embossing Machine 8.5″ Platform
- Sizzix Stamp and Stencil Tool
- Sizzix Sticky Grid Sheets
Thank you for stopping by today! Have a great day!
Lisa
Follow me for more inspiration:
- Blog – https://lisamearscarddesigns.com/
- Instagram – LisaMearsDesigns
- Facebook – Lisa Mears Designs
- Pinterest – https://www.pinterest.com/lisamearsdesigns/
- You Tube – https://www.youtube.com/c/LisaMearsDesigns
- Etsy – https://www.etsy.com/shop/LisaMearsCardDesigns
