

Hello crafty friends.
This month Pretty Pink Posh has released some amazing spring and Easter stamps, dies, and stencils. Today I’m going to be sharing four cards that I made with products from this release.
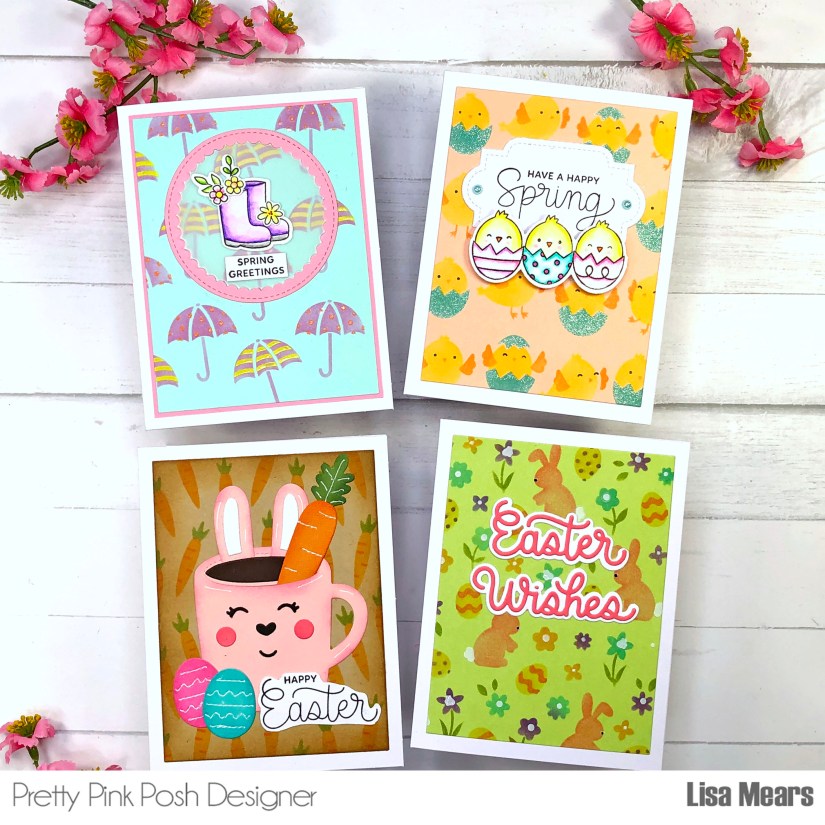
I am especially going to focus on the layered stencils in this release. I love using layered stencils to make cards because they make for such easy cards. All you have to do is pick your favorite color ink and you have a beautiful stencil background which can be cut down to put on a card base. Many times you can just add a sentiment and be done or you can add stamps and sentiments for a little more detail. It’s really up to you!
Before I share more details about my cards, I want to let you know that Pretty Pink Posh is having a blog hop where you have a chance to win one of six $25 gift certificates to the Pretty Pink Posh shop. Be sure to read all the way to the end of this post to find out more about the blog hop, see some of the cards I made with this release, and find links to all of the supplies I used to make my cards.
If you would like to see all of the products in the release, you can watch my video below or on YouTube.
You can purchase all of the products in one bundle and save 10 percent!!
To purchase the March 2023 bundle click HERE.
To purchase the stencil bundle, click HERE.
If you would like to see how I made all of my cards, be sure to check out my video below or on YouTube.
Card 1
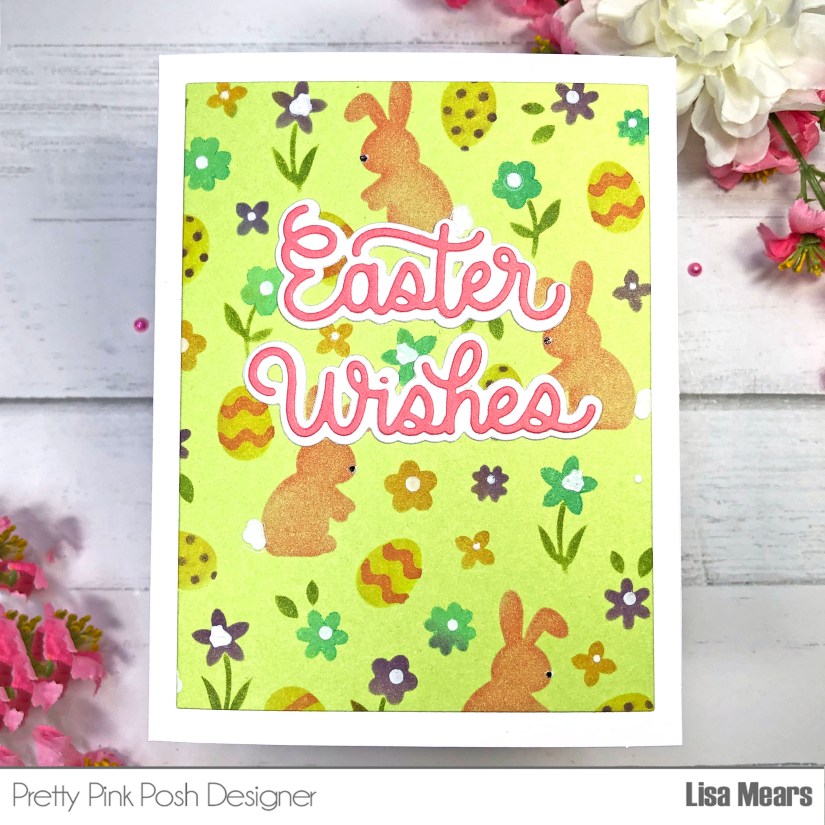
For my first card, I used the Pretty Pink Posh Layered Easter Floral stencil.
For all of my cards, I’ll be using colored card stock. Using colored card stock is just another way of stepping up your stenciling techniques, but you can use white card stock if you prefer and it will look just as nice. I chose a piece of green card stock for this stencil background because I wanted it to look like the bunnies, flowers, and Easter eggs are in the grass. I used different color inks to create a colorful stenciled background. For the last layer (Layer D), I added white Pops of Color for the bunny tails and flower centers. I did color the noses of the bunnies with a black sharpie after stenciling because I thought the black looked must better than white for the noses. You will see this on the finished card.
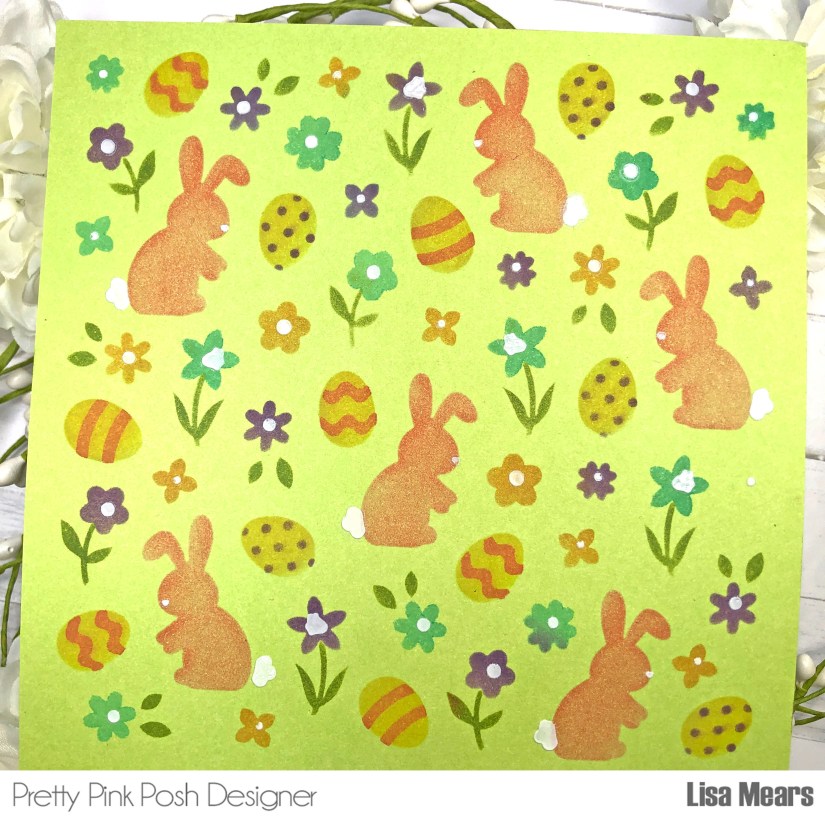
I love how colorful the stenciled background is! This stencil truly makes up the entire card with all of the detailed images so I just cut to down to fit on an A2 card base. To finish this card, I simply added a sentiment. The sentiment I used is the Pretty Pink Posh Easter Wishes Shadow.
If you want to see how I made this card, watch my video on YouTube.
Products Featured:
- Pretty Pink Posh Layered Easter Floral Stencil
- Pretty Pink Posh Easter Wishes Shadow Die
- Scrapbook.com Inks — Carnival Pink, Mardi Gras, Caribbean, Orange Cream, Rubber Ducky, Honeycomb, Succulent
- Scrapbook.com Pops of Color – White
- Spellbinders A2 Precision Layering Die Set
- Ranger Palette Knife
- Scrapbookcom Ink Blending Tool
- Scrapbookcom Sponge Daubers
- Scrapbook.com Smooth Cardstock – Floral
- Wendy Vecchi Make Art Stay-tion
Card 2
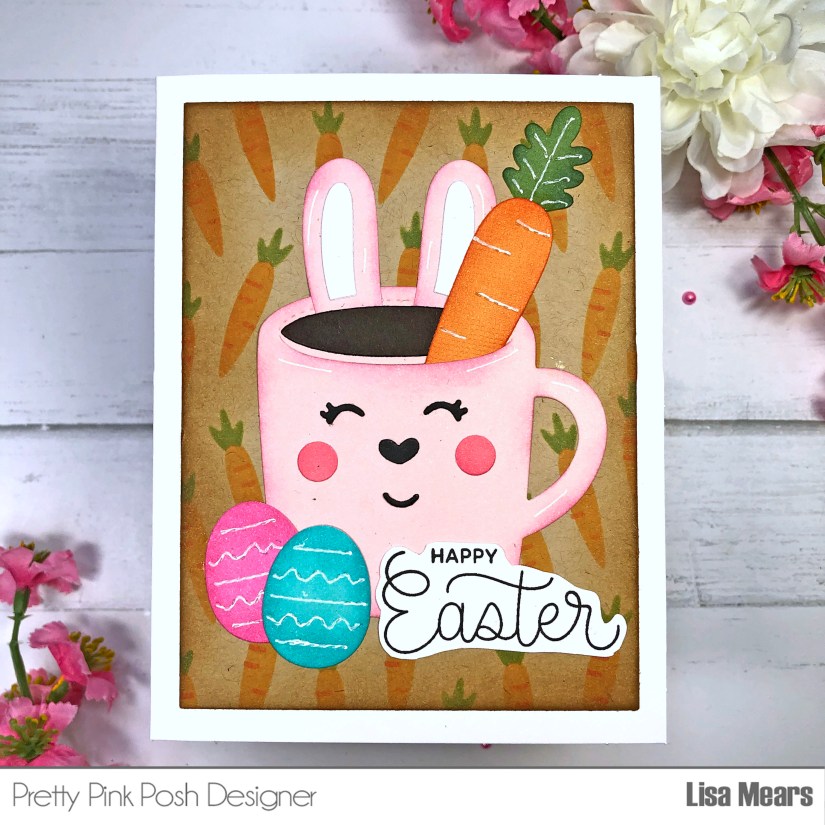
For my next card, I used the Pretty Pink Posh Layered Carrots stencil. I inked the stencil on a kraft color cardstock using orange and green inks.
I cut down the card panel using a Spellbinders A2 layering die and added the Scrapbook.com Gingerbread ink around the edges. I used the Pretty Pink Posh Easter Mug Additions die set that coordinates with the Winter Mug die set to make my mug look like a bunny and I added a sentiment from the Easter Sentiments stamp set.
If you want to see how I made this card, watch my video on YouTube.
Products Featured:
- Pretty Pink Posh Layered Carrots Stencil
- Pretty Pink Posh Easter Mug Additions
- Pretty Pink Posh Winter Mug
- Pretty Pink Posh Easter Sentiments
- Spellbinders A2 Precision Layering Die Set
- Scrapbookcom Inks — Gingerbread, Pink Flamingo, Oasis, Succulent, Orange Spice
- Scrapbook.com Smooth Cardstock – Sherbet
- The Stamps of Life Cardstock – Gingersnap and Chocolate
- Other Cardstock (from stash)
- Scrapbookcom Ink Blending Tool
- Wendy Vecchi Make Art Stay-tion
Card 3
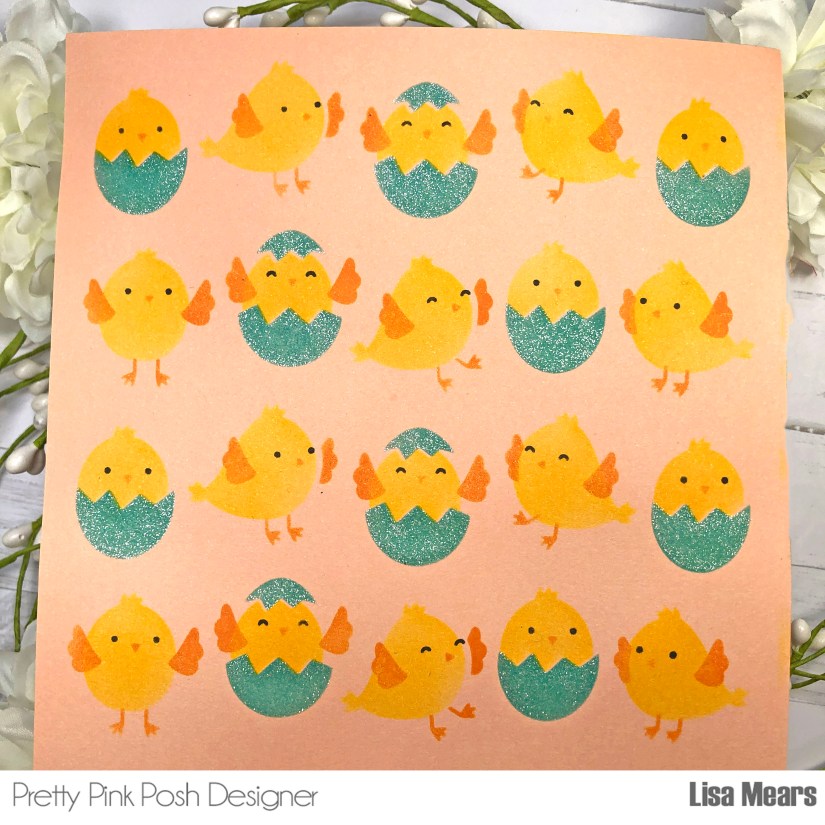
For my next card, I used the Pretty Pink Posh Layered Chicks stencil and inked the stencil onto a peach colored cardstock. After adding ink to all of the stencils, I added back the Layer C stencil, which is the egg shell layer, and applied Brutus Monroe’s Alabaster Glitter Glaze. The glitter glaze is a clear glaze with glitter added to it. What’s nice about this type of glitter glaze is that the underlying ink color shows through it which makes it look like the teal eggs have a glitter.
 I used a rectangle die to cut down the stencil. I added a sentiment from the Easter Sentiments stamp set to the label die in the coordinating die set. I also added a stamp from the Spring Chicks stamp set and added a few of the Sea Foam Pearls.
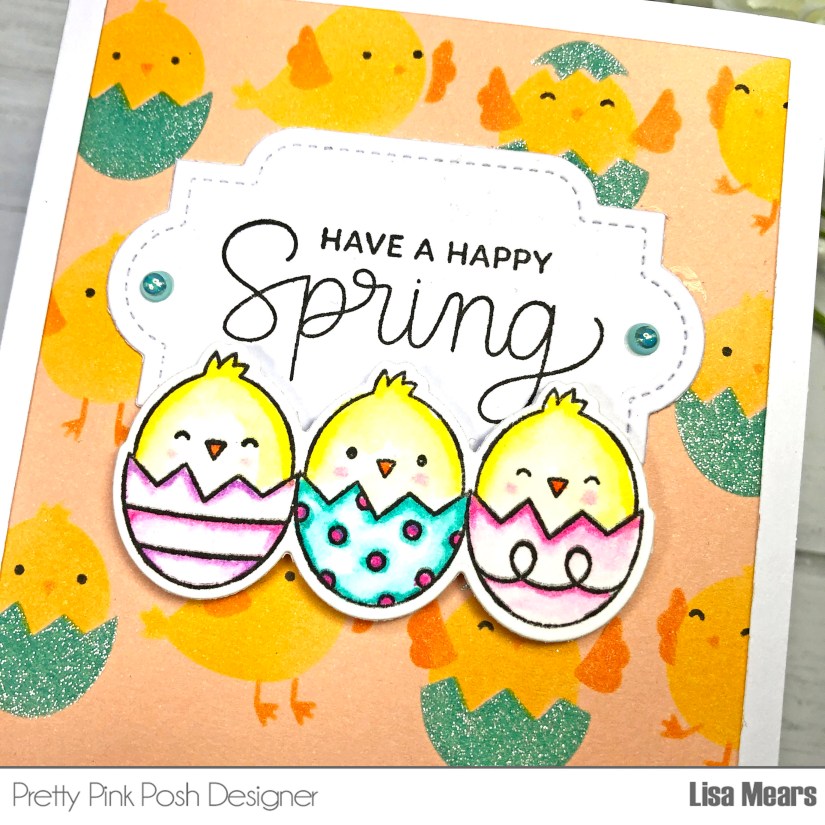 I added this panel to a white A2 size card base.

If you want to see how I made this card, watch my video on YouTube.
Products Featured:
- Pretty Pink Posh Layered Chicks Stencil
- Pretty Pink Posh Easter Sentiments Stamp Set and Coordinating Dies
- Pretty. Pink Posh Spring Chicks Stamp Set and Coordinating Dies
- Pretty Pink Posh Sea Foam Pearls
- Spellbinders A2 Precision Layering Die Set
- Scrapbook.com Smooth Cardstock – Boho
- Scrapbook.com Inks – Daffodil, Orange Cream, Oasis, Black Hybrid
- Zig Clean Color Real Brush Pens – Yellow, Orange, Turquoise Green, Sugared Almond Pink, Peach Pink, Light Violet
- Bristol Smooth Cardstock (for stamping/coloring)
- Brutus Monroe Glitter Glaze – Alabaster
- Scrapbook.com Ink Blending Tool
- Ranger Palette Knife
- Wendy Vecchi Make Art Stay-tion
Card 4
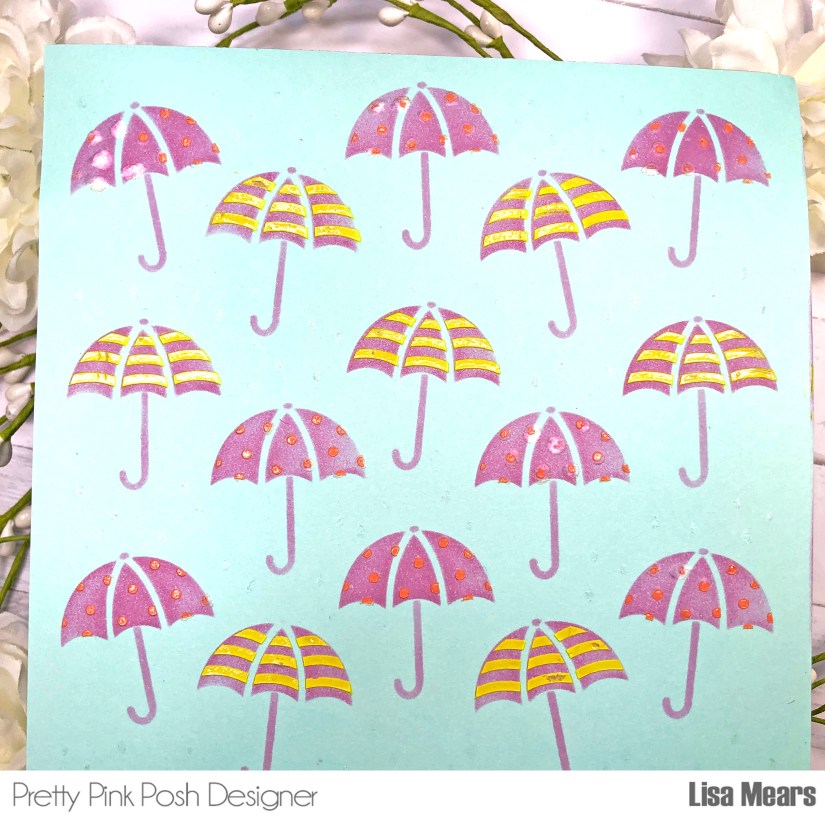
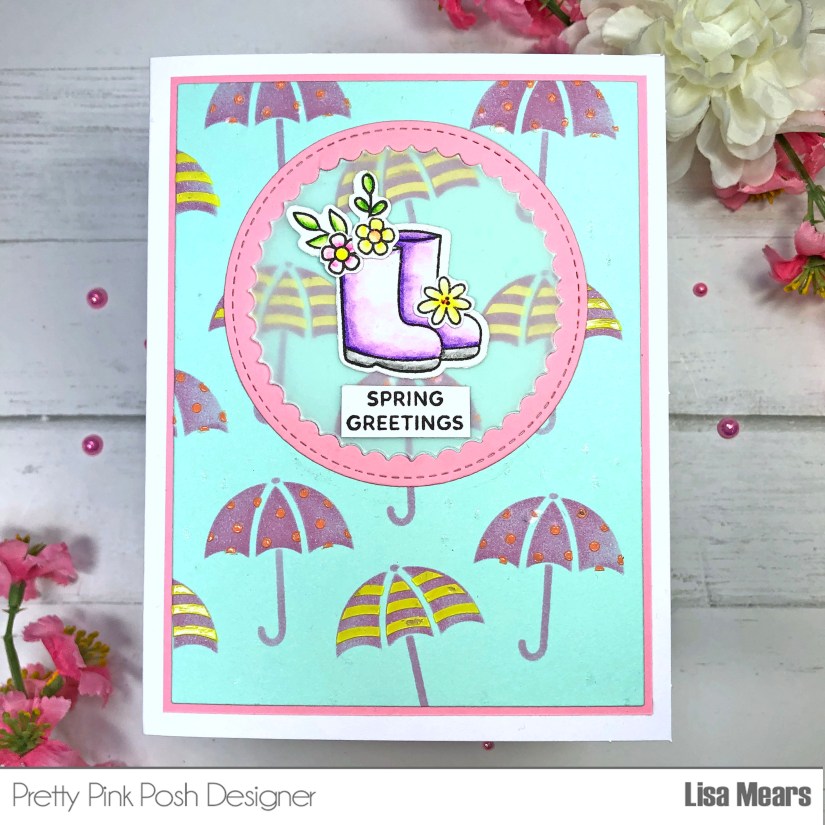
For this card, I used the Pretty Pink Posh Layered Umbrellas stencil. I inked the umbrellas onto a light blue cardstock because I wanted it to look like the sky behind the umbrellas. I used Scrapbook.com Candy Shop Pink ink for Layer A, Scrapbook.com Pink Flamingo ink for Layer C, and Scrapbook.com Pops of Color for Layer B. (Yes, I used the stencils out of order too!) . The Pops of Color were applied to the dots and stripes on the umbrellas. I used the Summer Peach and Sunshine Pops of Color.
Note: When using Pops of Color, make sure you work quickly to apply them and remove your stencil before the Pops of Color dries too much. Otherwise, when you remove the stencil, you may find that it tears the cardstock like mine did in a few places. I wasn’t worried about it though because I was able to cut only the parts of the stencil that I wanted to use on my card and hide the mistakes on the finished card.
For Layer D (raindrops), I added the Brutus Monroe Silver Glitter Glaze (although it’s hard to see in the picture).
I used a scallop circle die with vellum on the inside of the circle so that the beautiful stenciled background could still be seen. I added the rain boots and flowers stamps from the Pretty Pink Posh Flower Garden stamp set and added a sentiment from the Pretty Pink Posh Spring Jar stamp set.
I colored the stamps with Zig Clean Color Real Brush Markers in the following colors — Violet, Lilac, Dark Gray, Yellow, Orange, and Peach Pink. I also used the Blender marker to blend the colors.
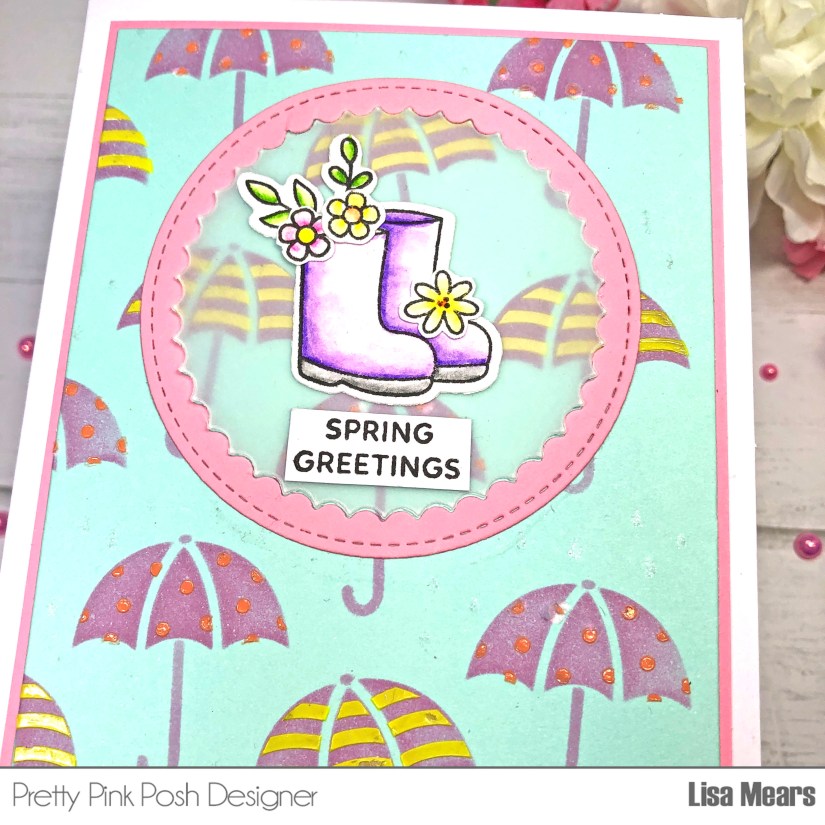
I added a pink piece of cardstock around the umbrella layer and added it to an A2 size card.
Products Featured:
- Pretty Pink Posh Layered Umbrellas Stencil
- Pretty Pink Posh Flower Garden Stamp Set and Coordinating Dies
- Pretty Pink Posh Spring Jar Stamp Set and Coordinating Dies
- Pretty Pink Posh Scallop Circle Die
- Spellbinders A2 Precision Layering Die Set
- Scrapbook.com Inks: Candy Shop Pink, Pink Flamingo
- Scrapbook.com Pops of Color – Summer Peach and Sunshine
- Brutus Monroe Glitter Glaze, Silver
- Scrapbook.com Smooth Cardstock – Sherbet
- Lawn Fawn Vellum
- Zig Clean Color Real Brush Pens – Violet, Lilac, Dark Gray, Yellow, Orange, and Peach Pink.
- Ranger Palette Knife
- Scrapbookcom Ink Blending Tool
- Bristol Smooth Cardstock (for stamping/coloring)
- Versafine Onxy Black Ink (for stamping)
- Wendy Vecchi Make Art Stay-tion
- Misti Stamping Tool
I would love for you to leave me a comment and let me know which card or stencil is your favorite. Also, be sure to follow along in the Pretty Pink Posh Blog Hop where you have a chance to win one of six $25 gift certificates to the Pretty Pink Posh store (two winners each day). Winners will be picked randomly along the blog hop. Comments must be left by 11:59 pm PST on 3/14/2023. Winners will be announced on the PPP blog.
Below are blog links for the other blog hop participants.
Wanda Guess
Lynn Put
Raquel Arribas
Carly Minner
Jeannie Lieu
Stefanie Loh
Lisa Mears– YOU ARE HERE
Thank you so much for stopping by today. Have a wonderful day!
Follow me for more inspiration:
- Blog – https://lisamearsdesigns.com/
- Instagram – LisaMearsDesigns
- Facebook – Lisa Mears Designs
- Pinterest – https://www.pinterest.com/lisamearsdesigns/
- You Tube – https://www.youtube.com/c/LisaMearsDesigns
- Etsy – https://www.etsy.com/shop/LisaMearsDesigns

Love all these soft, cheerful and pretty cards! Those layering stencils are dynamite.
Lori S in PA
LikeLiked by 1 person
Totally obsessed with the mug additions thank you for sharing
LikeLiked by 1 person
These are such cute cards… so colorful and cheerful. I love the stencils in this release and in your cards, they are used really wonderful. Thank you for sharing.
LikeLiked by 1 person
Thank you so much.
LikeLike
These are all adorable! YOUR STENCILING IS PHENOMENAL! Love the coloring!
LikeLiked by 1 person
Thank you so much Meghan
LikeLike
I love those wonderful, fun cards! This is such an amazing Spring release — Pretty Pink Post never disappoints!
LikeLiked by 1 person
I love the PPP stencils. They’re just designed so perfectly for card making. Thank you for sharing these great cards.
LikeLiked by 1 person
Awesome variety of cards showcasing this new fun release.
LikeLiked by 1 person
Love these cards, I’m so totally addicted to the layered stencils! So many fun possibilities. PPP’s new release is so fun!
LikeLiked by 1 person
Wonderful cards Lisa! I love the stencils in this release.
LikeLiked by 1 person
Your cards are just wonderful and fun! I love the layered stencils and the cute Easter Mug additions.
LikeLiked by 1 person
Great cards, love the stencils! Wonderful instructions also!
LikeLiked by 1 person
I like the backgrounds for these cute Spring cards.
LikeLiked by 1 person
Thanks for the videos and wow all the cute inspiration!
LikeLiked by 1 person
Love the stenciled backgrounds on these pretty cards! Sweet designs!
LikeLiked by 1 person
I love stencils and have never tried using them on colored card stock but I will now.
Thanks for the inspiration and for sharing your talent.
LikeLiked by 1 person
These stencils are so fun. You showcased them beautifully.
LikeLiked by 1 person
Love all of these spring cards! Thank you for the detailed instructions!
LikeLiked by 1 person
Beautiful cards! I love the layering stencils that PPP makes!
LikeLiked by 1 person
Such adorable cards!! Love the backgrounds
LikeLiked by 1 person
Thank you!
LikeLike
I especially love the stenciled carrots. They are too cute, and versatile. I would love to make some gardening cards.
LikeLiked by 1 person
Wonderful cards! Fantastic! I like all of them. My favorite is the third card with the chicks. Delight!
LikeLiked by 1 person
Lisa I am loving all the new stencils in this release. The carrots is my favorite. So many great cards and ideas. TFS
LikeLiked by 1 person
I just love ppp stencils. they are easy to use and add so much detail to a card. Wonderful use of mixed media. I just love these
LikeLiked by 1 person
Those stenciled chicks are so very cute!
LikeLiked by 1 person
Love all of your cards! Your stenciling is delightful, and they all turned out soooo cute!
LikeLiked by 1 person
Thank you for showcasing the stencils! All of your backgrounds are awesome!
LikeLiked by 1 person
such super sweet designs.
LikeLiked by 1 person
Thank you for giving us so many cute cards. These stencils are wonderful.
LikeLiked by 1 person
All of the cards are darling. Love the
carrot as the stirrer in the mug.
thanks for sharing.
LikeLiked by 1 person
Love the cute garden boots! Can’t wait to play with that set!
LikeLiked by 1 person
So super cute!
LikeLiked by 1 person
Very sweet cards. Love the new stencils from PPP.
LikeLiked by 1 person
LOVE what you created!
LikeLiked by 1 person
Love the layered umbrella stencil. Such a good
LikeLiked by 1 person
Darling cards! I love the stencil designs.
LikeLiked by 1 person
What a wonderful assortment of cards! Like the background stencils and what you added! And that mug card is wonderful. I am amazed at how many ways this mug had been used!
LikeLiked by 1 person
LOVE your gorgeous stenciled backgrounds !!!! Super fun springtime cards!!!
LikeLiked by 1 person
Beautiful cards! Love the stenciling you did!
LikeLiked by 1 person
Love your adorable spring cards! Thanks for sharing.
LikeLiked by 1 person
Such beautiful cards! Thank you for sharing!
LikeLiked by 1 person
Great ideas! Makes me want to craft
LikeLiked by 1 person