

Hello Crafty Friends.
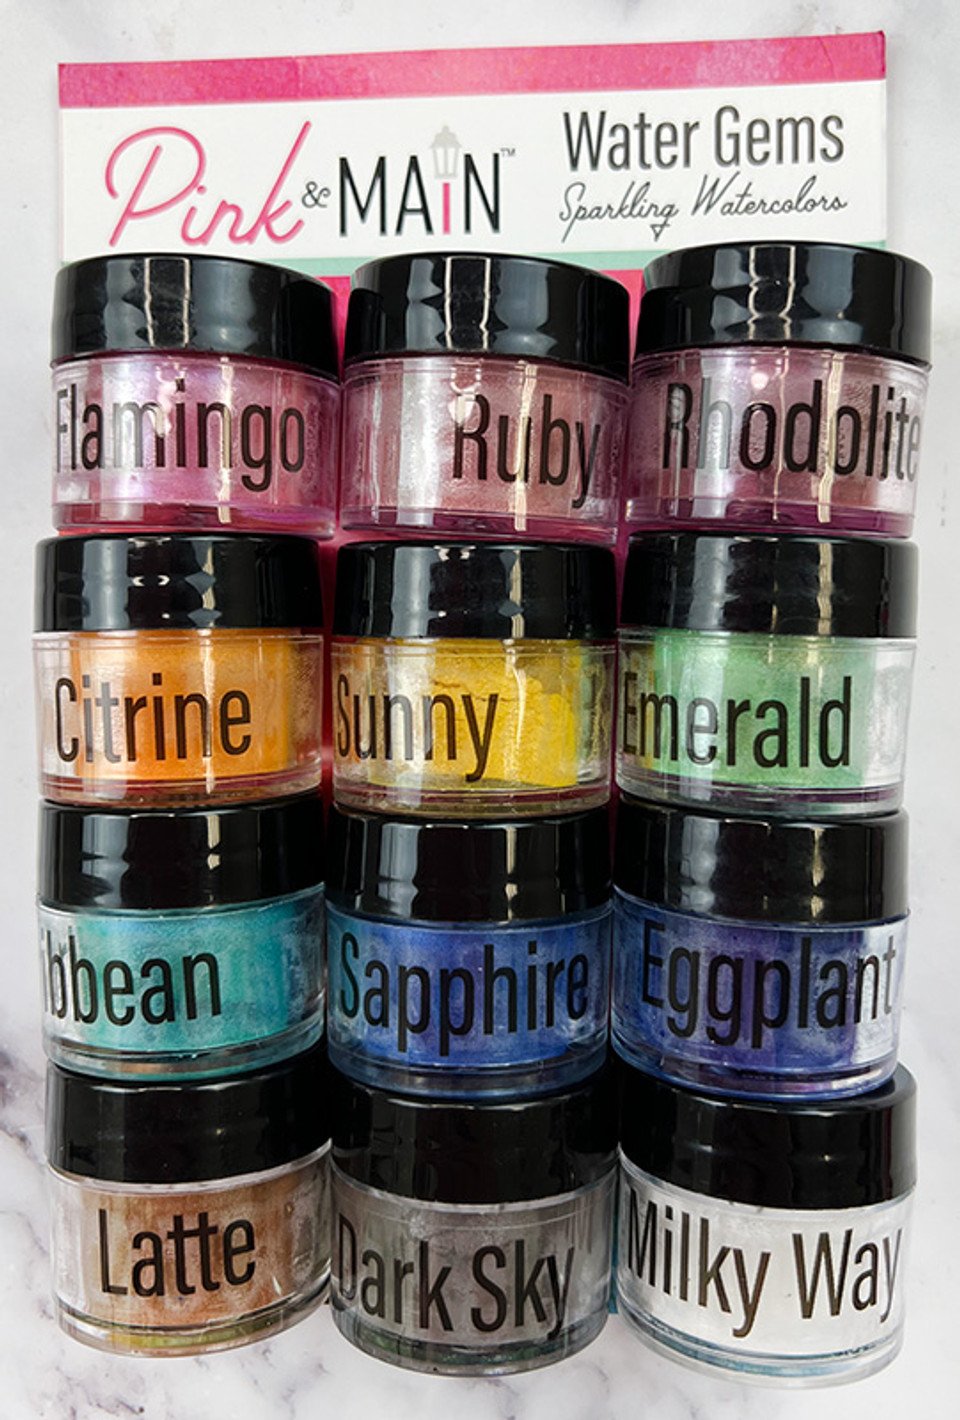
Today I’m going to share seven ways to use watercolor powders in cardmaking. The product that I’ll be using is new from Pink and Main which is their Water Gems Sparkling Watercolors. The water gems are 12 highly pigmented watercolor powders that have sparkle. After applying them to cardstock, you’ll see a beautiful sparkle and shine.
 There are many ways to use the Water Gems and in my YouTube video I’m going to show you 7 ways.
If you would like to watch as I explain all of the ways to use Pink and Main’s Water Gems, then watch my video below or on YouTube.
Technique 1 – Coloring Stamped Images by Sprinkling the Powder onto the Stamp
For this technique, I stamped the image first and then sprinkled the water gems onto the cardstock. Next, I sprayed the cardstock with water and let the powders react with the water. This technique gives the stamp more of an abstract look since some of the color is outside the lines. However, this is a way to quickly add color without actually coloring.

SUPPLIES USED:
- Pink and Main Water Gems Sparkling Watercolors (Colors used: Sunny, Emerald, Rhodolite, Sapphire, Citrine)
- Scrapbook.com Slimline Floral Stamp Set
- Ranger Distress Watercolor Cardstock
- Scrapbook.com Rainbow Glitter Paper Pad, Slimline
- Sizzix Stamp and Stencil Tool
- Versafine Onxy Black Ink
- Ranger Clear Embossing Powder
- Heat Tool
- Ranger Distress Sprayer
Technique 2: Coloring Stamped Images Using a Water Brush and Water Gems
With this technique, I used the Pink and Main Water Gems with a water brush to paint the color onto the stamp. I stamped the image with Versafine Onxy Black ink, sprinkled clear embossing powder, and heat set it. I sprinkled some water gems onto my mat, added some water to the powder, and used a water brush to paint the color onto the stamp.
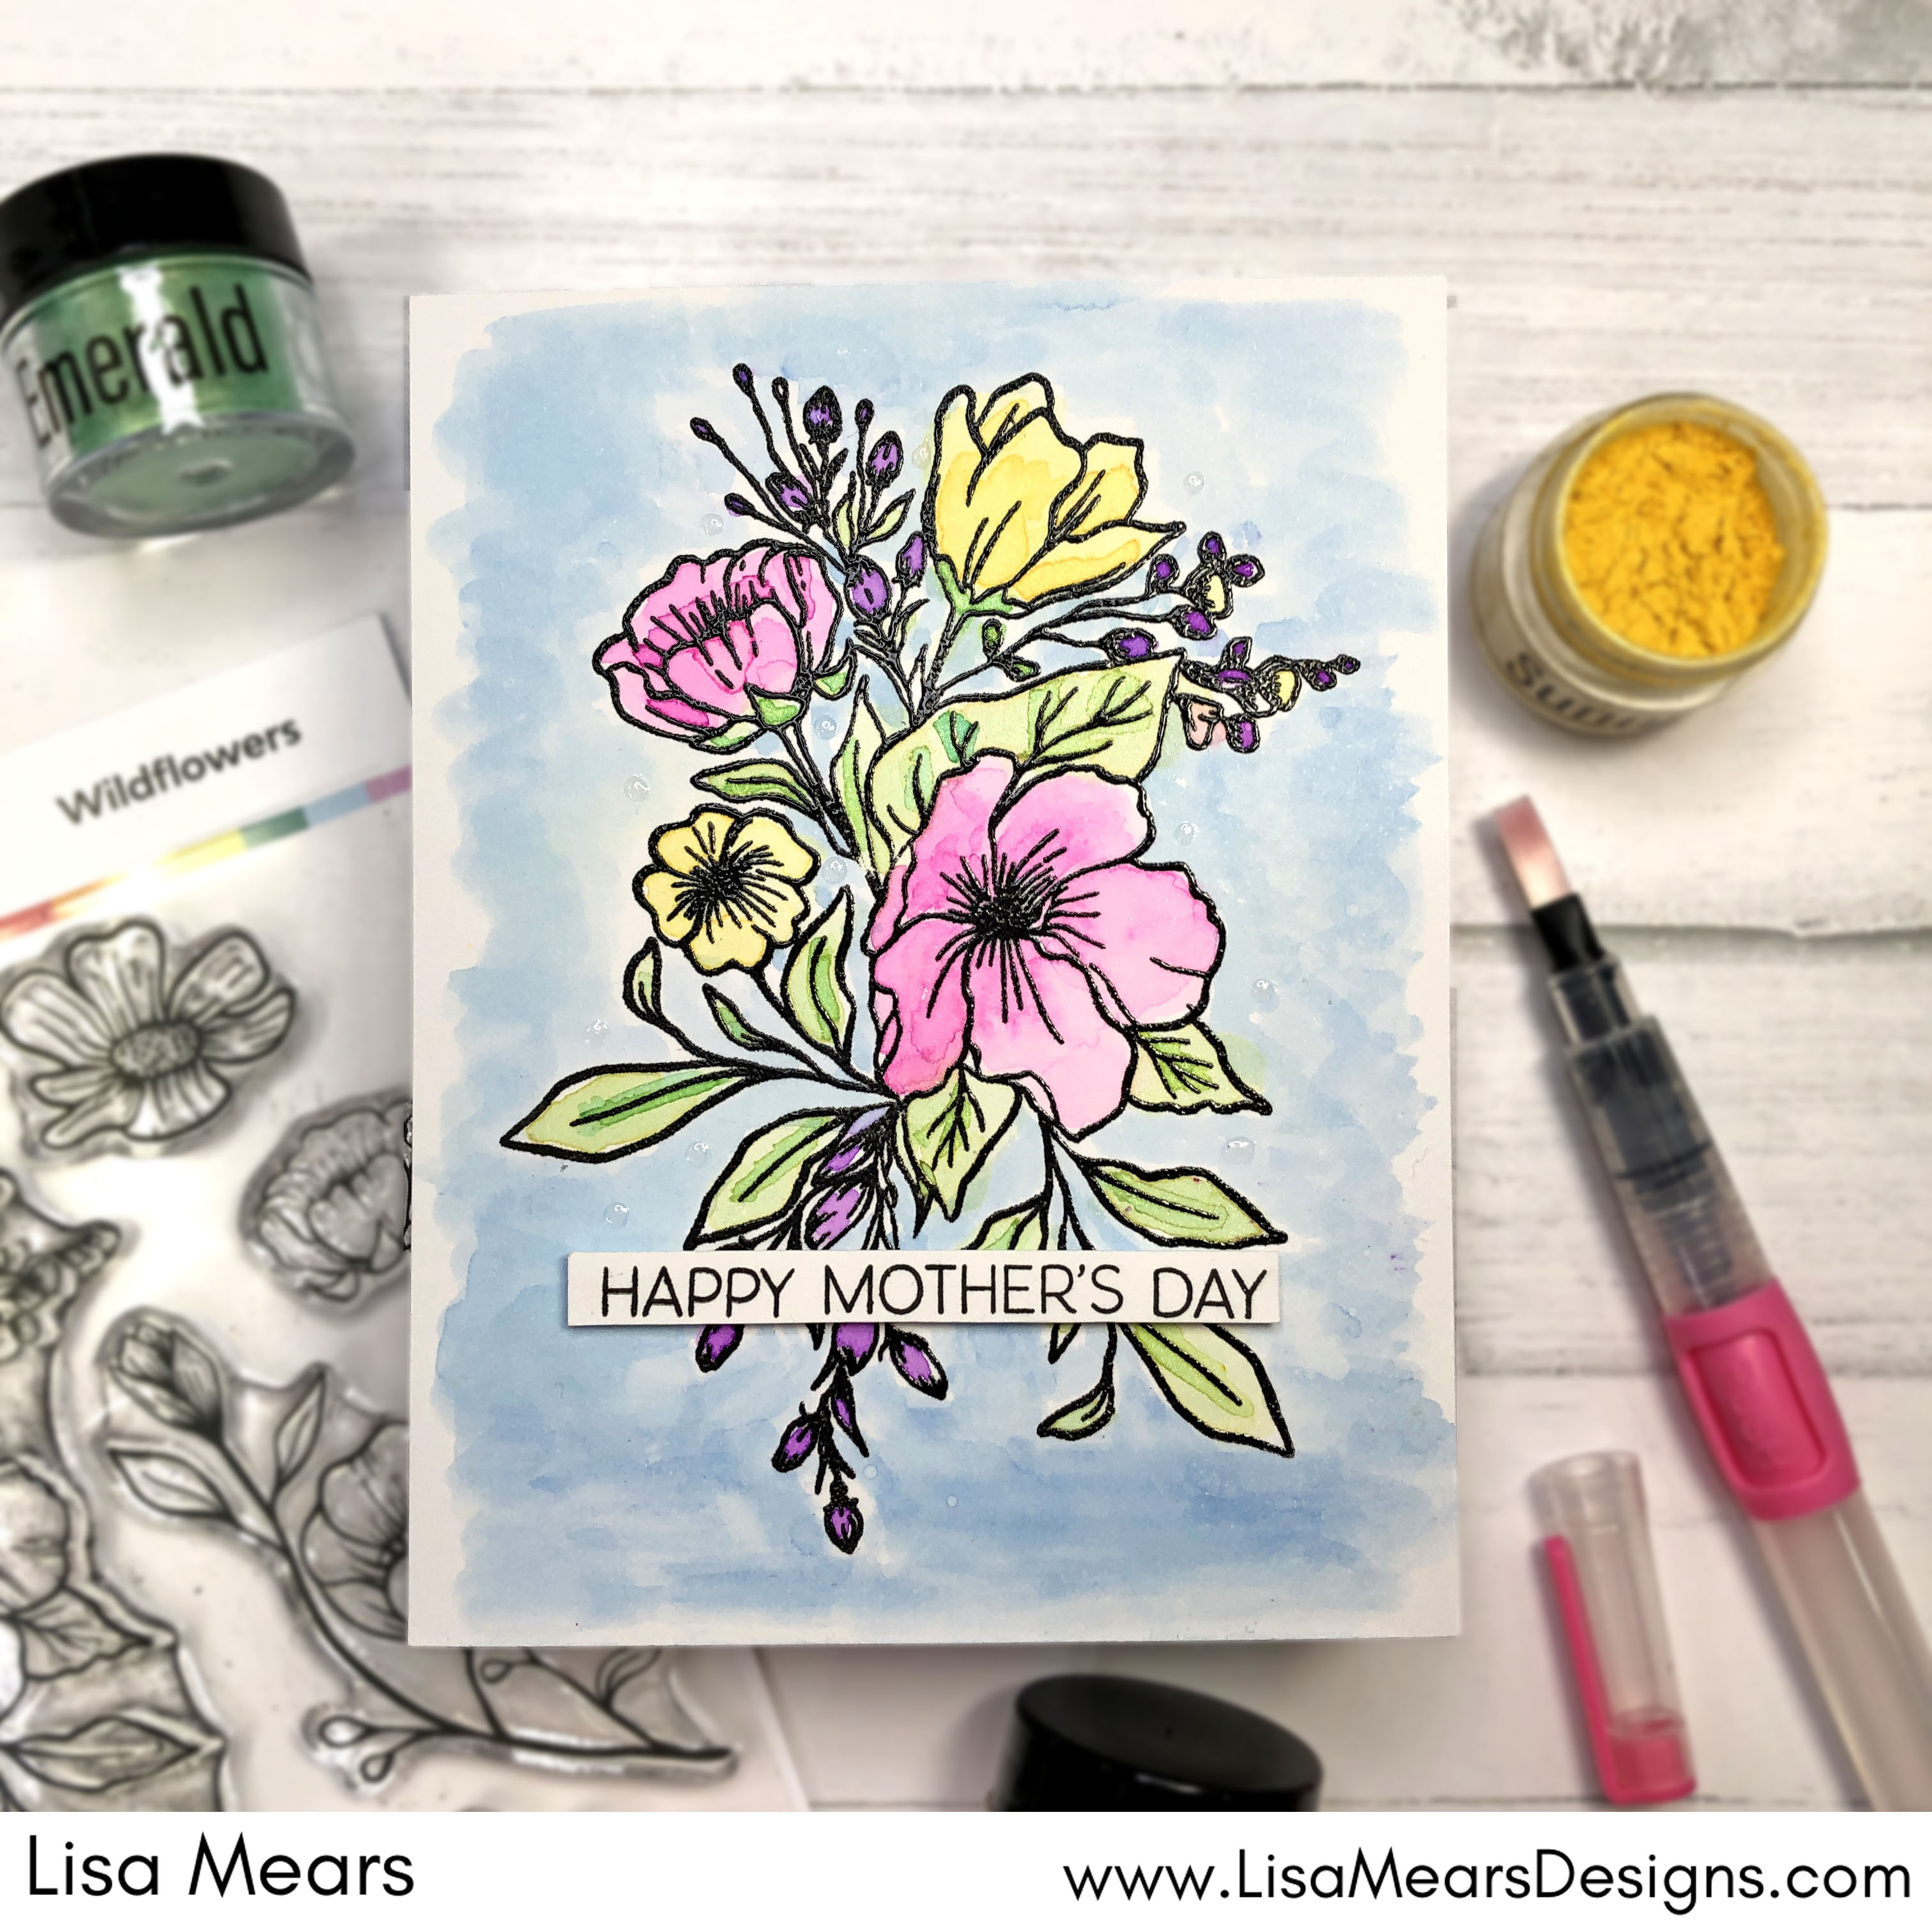
With this method you will get a much cleaner look because the color stays inside the lines. I used the new Pink and Main EZ Flow Water Brushes to color my stamp.

Using these brushes is so easy. Simply unscrew the barrel, add water, and close the barrel. Next, press the pink part of the brush that reads ‘Push” to move the water to the bristles. Next, dip the bristles into the watercolor and paint. (Note – Make sure you dip the brush into the watercolor liquid which is the powder that you add water to. Do not dip the brush into the powder.)
SUPPLIES USED:
- Pink and Main Water Gems Sparkling Watercolors (Colors used: Sunny, Citrine, Emerald, Flamingo, Sapphire)
- Pink and Main EZ Flow Water Brushes
- Scrapbook.com Wildflowers Stamp Set
- Scrapbook.com Cheerful Sentiments Stamp Set
- Bristol Smooth Cardstock
- Scrapbook.com Foam Strips
- Nuvo Crystal Drops, Morning Dew
- Sizzix Stamp and Stencil Tool
- Versafine Onxy Black Ink
- Ranger Clear Embossing Powder
- Heat Tool
- Ranger Distress Sprayer
Technique 3 – Sprinkle Water Gems onto a Stencil
With the next technique, place a stencil over the watercolor cardstock. Next, sprinkle the water gems powder onto the stencil and then spray with water to let the color react with the water. Press a paper towel on top to soak up some of the water. Next, remove the paper towel and stencil. The background this creates is more of a mixed media look.

SUPPLIES USED:
- Pink and Main Water Gems Sparkling Watercolors (Colors used: Flamingo, Emerald)
- Scrapbook.com Spring Floral Stencil
- Scrapbook.com Butterflies 1 Dies
- Scrapbook.com Holographic Mirror Paper
- Scrapbook.com Pops of Color, Glitter Gold
- Scrapbook.com Wordfetti Sunny Days Stamp Set
- Scrapbook.com Metallic Gold Ink
- Ranger Princess Gold Embossing Powder
- Heat Tool
- Versamark Ink
- Bristol Smooth Cardstock
- Ranger Distress Sprayer
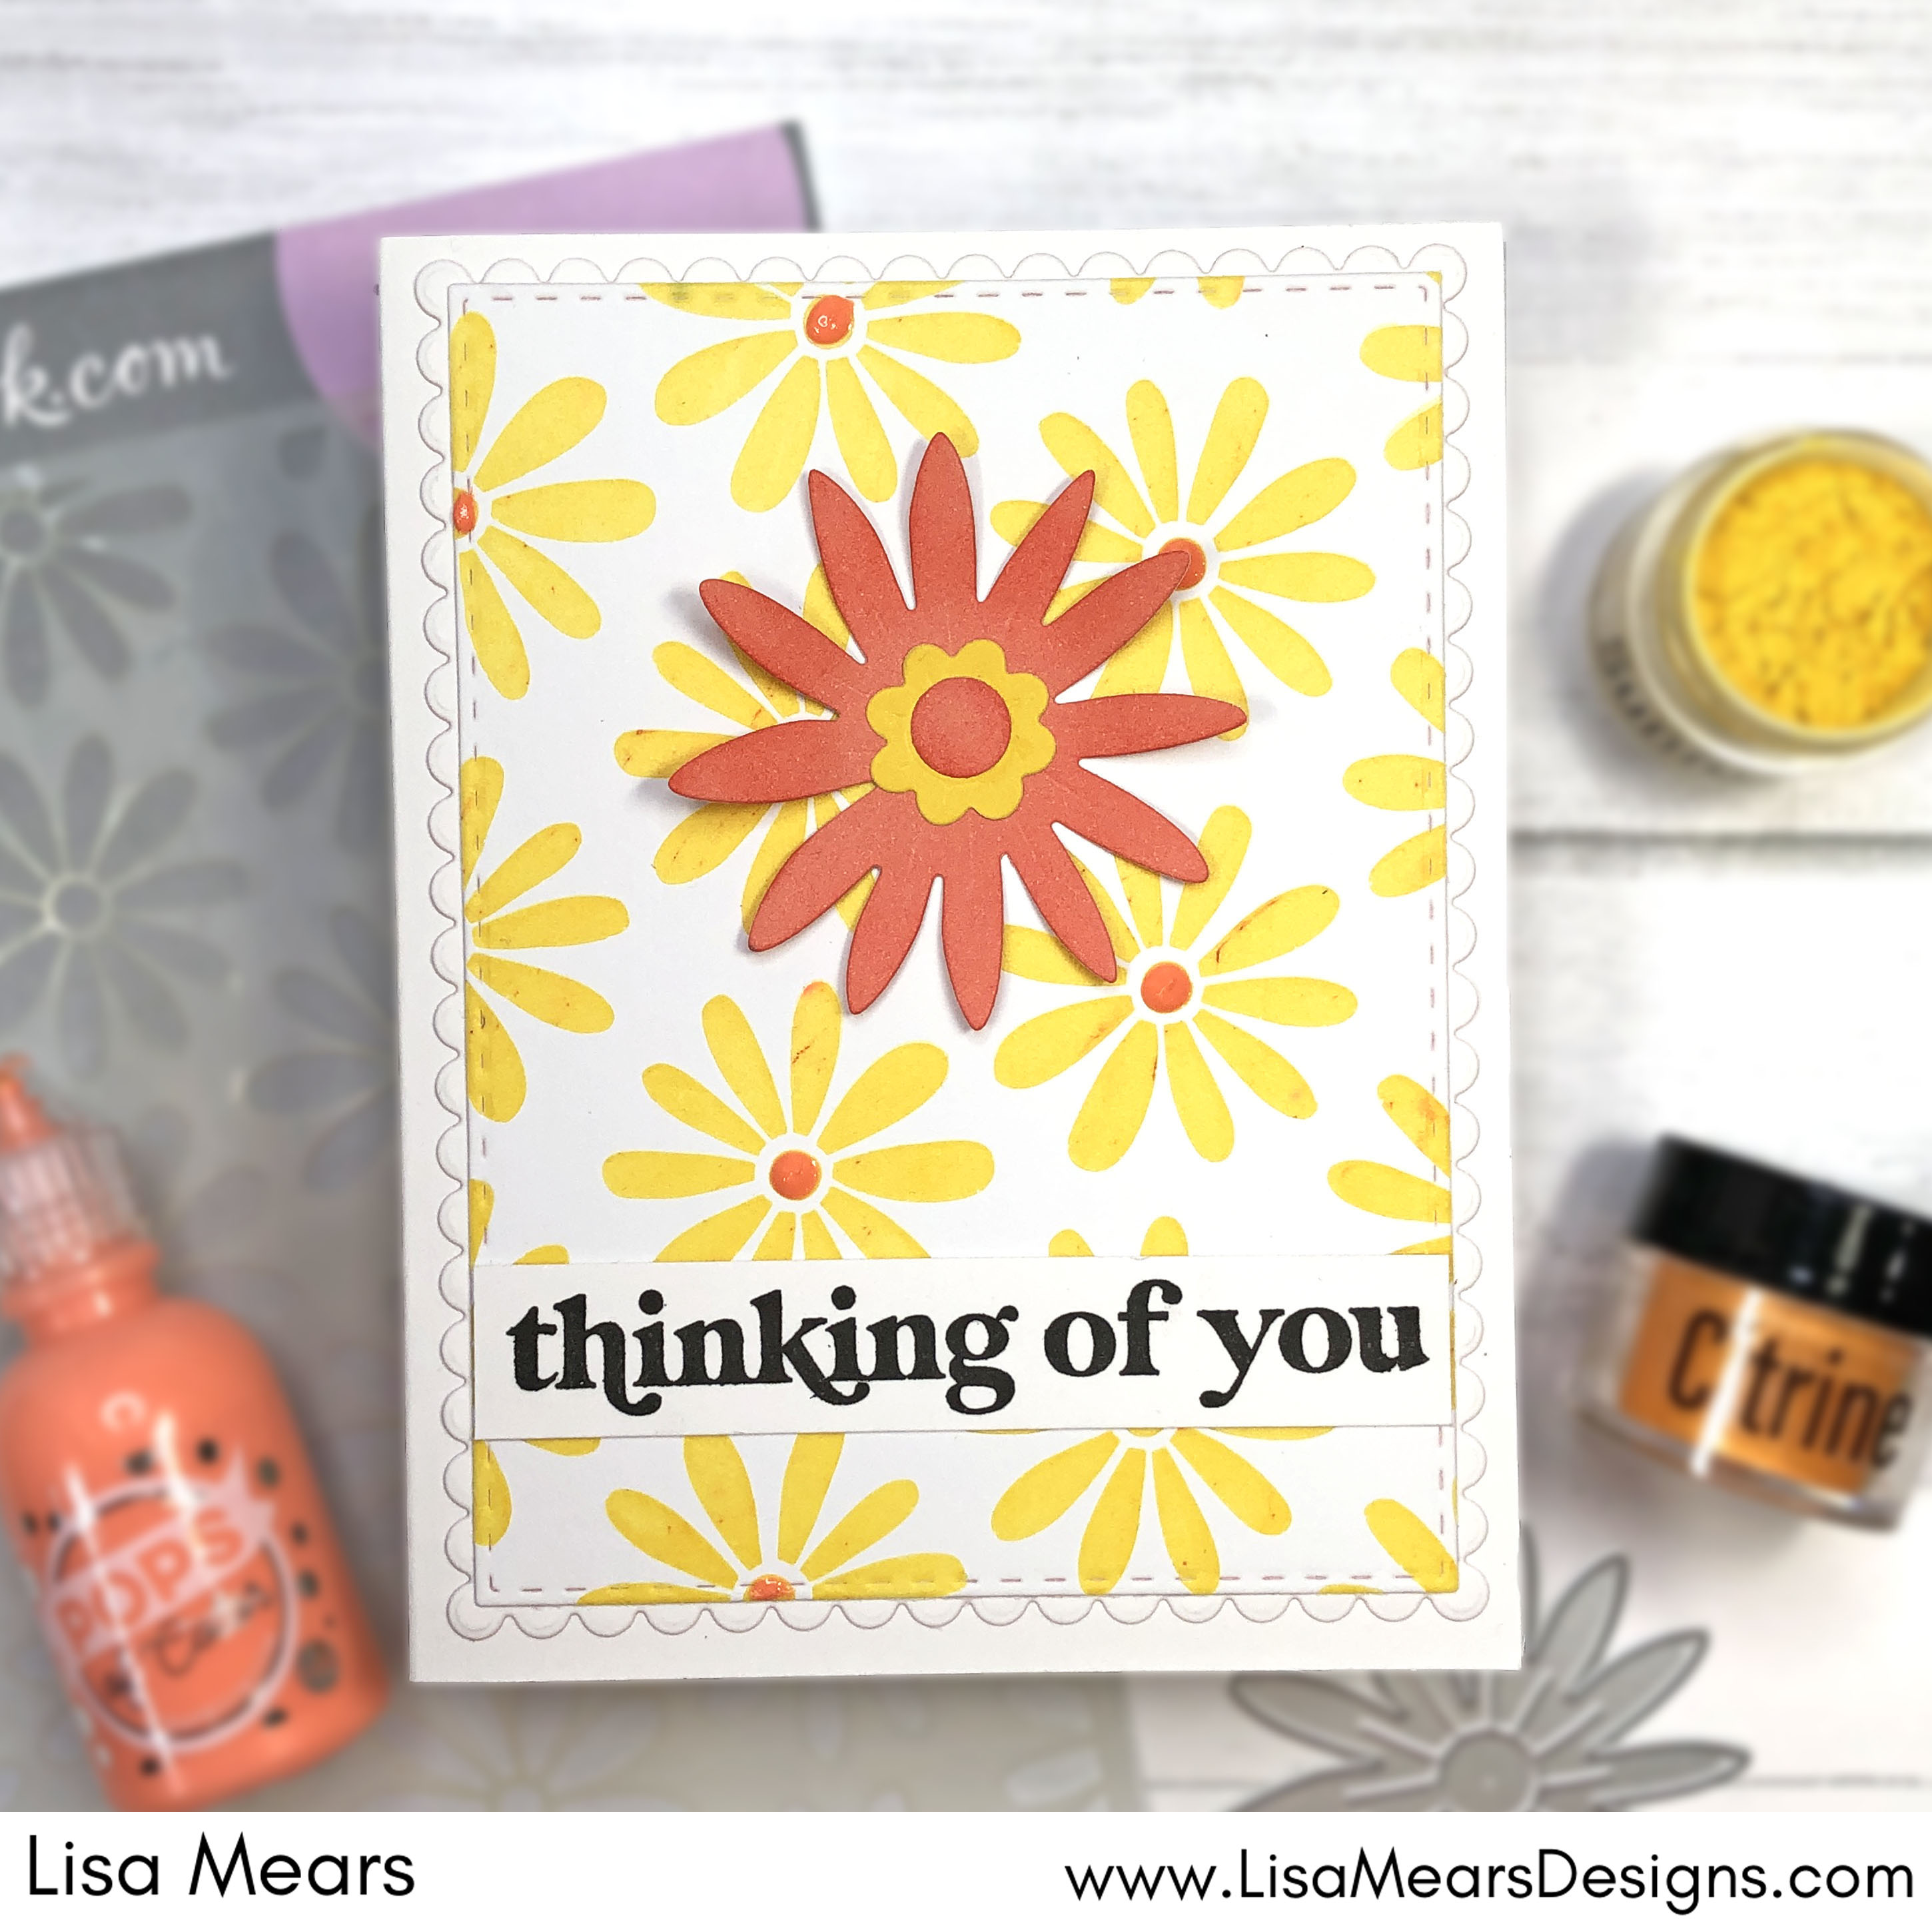
Technique 4: Use Water Gems with Texture Paste on White Cardstock
The next technique also involves stencils, but this time I’m going to use the water gems with Ranger Texture Paste. To do this, use a palette knife to add some texture paste onto a nonstick mat. Next, add water gem powder to the texture paste and mix with the palette knife. The more powder you add to the texture paste, the darker the color will be. Next, spread the texture paste over the stencil to cover all of the stencil openings. Scrape off any excess paste. Be sure to let the stencil dry completely.
SUPPLIES USED:
- Pink and Main Water Gems Sparkling Watercolors (Color used: Citrine)
- Scrapbook.com Daisy Stencil
- Ranger Texture Paste, Transparent Matte
- Scrapbook.com Sunny Lane Florals
- Scrapbook.com Playful Cardstock
- Scrapbook.com Pops of Color, Summer Peach
- Scrapbook.com Botanical Borders with Sentiments Stamp Set
- Pink and Main Stitched Rectangle Die
- Pink and Main Scallop Rectangle Die
- Ranger Palette Knife
- Bristol Smooth Cardstock
- Versamark Onyx Black Ink
Technique 5: Use Water Gems with Texture Paste on Colored Cardstock
I wanted to see how Technique 4 would look on colored cardstock so this time I used a green cardstock with the texture paste and water gems. I also used three different colors of the water gems to create a multicolor look. I also used the water gems to color the stamped image as I explained in Technique 2.

SUPPLIES USED:
- Pink and Main Water Gems Sparkling Watercolors (Color used: Emerald, Latte, Citrine for stencil; Lattee and Emerald for stamp)
- Pink and Main EZ Flow Water Brushes
- Lawn Fawn Tropical Leaves Stencil
- Pink and Main Toucan Do It Stamp Set
- Pink and Main Stitched Rectangle Die
- Bristol Smooth Cardstock (stamp)
- Heat Tool
- Ranger Distress Sprayer
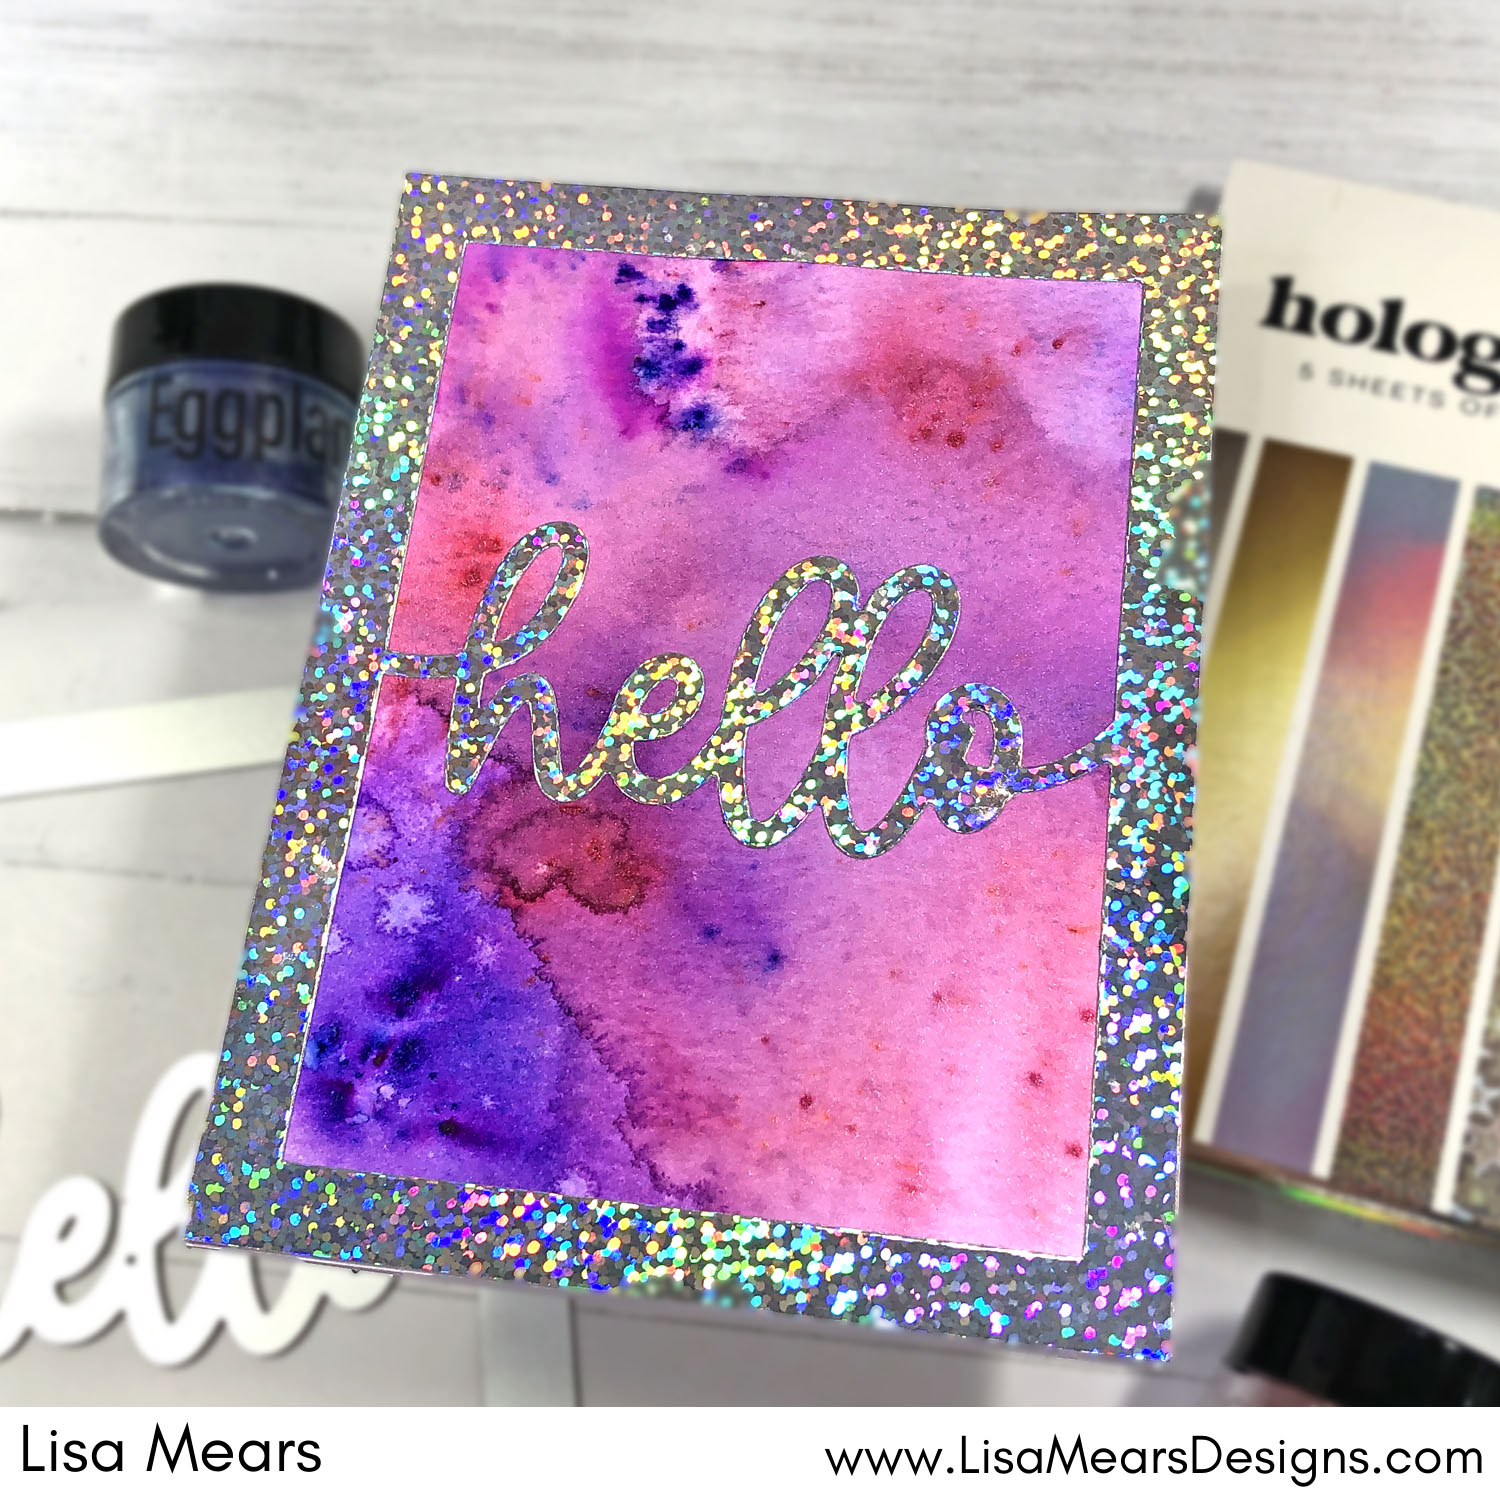
Technique 6: Use the Water Gems for Card Backgrounds
For this technique, I sprinkled the water gems onto watercolor cardstock and then spritzed it with water to let the water gems react with the water. With this method, if you want the color to appear darker or just want to add more color, I suggest using a heat tool to dry the background and then add more of the powder and water. I added the Scrapbook.com Hello A2 plate to the top of the background. I just love how the watercolor background shows behind the cover plate.
SUPPLIES USED:
- Pink and Main Water Gems Sparkling Watercolors (Colors used: Eggplant, Ruby)
- Scrapbook.com A2 Plate, Hello
- Scrapbook.com Holographic Mirror Paper
- Ranger Distress Watercolor Cardstock
- Heat Tool
- Ranger Distress Sprayer
Technique 7: Create Watercolor Backgrounds and Die Cut the Backgrounds with Dies
With this technique, I created watercolor backgrounds like I mentioned in Technique 6. Next, I used the Scrapbook.com Sunny Lane Floral dies to die cut the backgrounds. I love all of the beautiful colors in the flower die cuts.
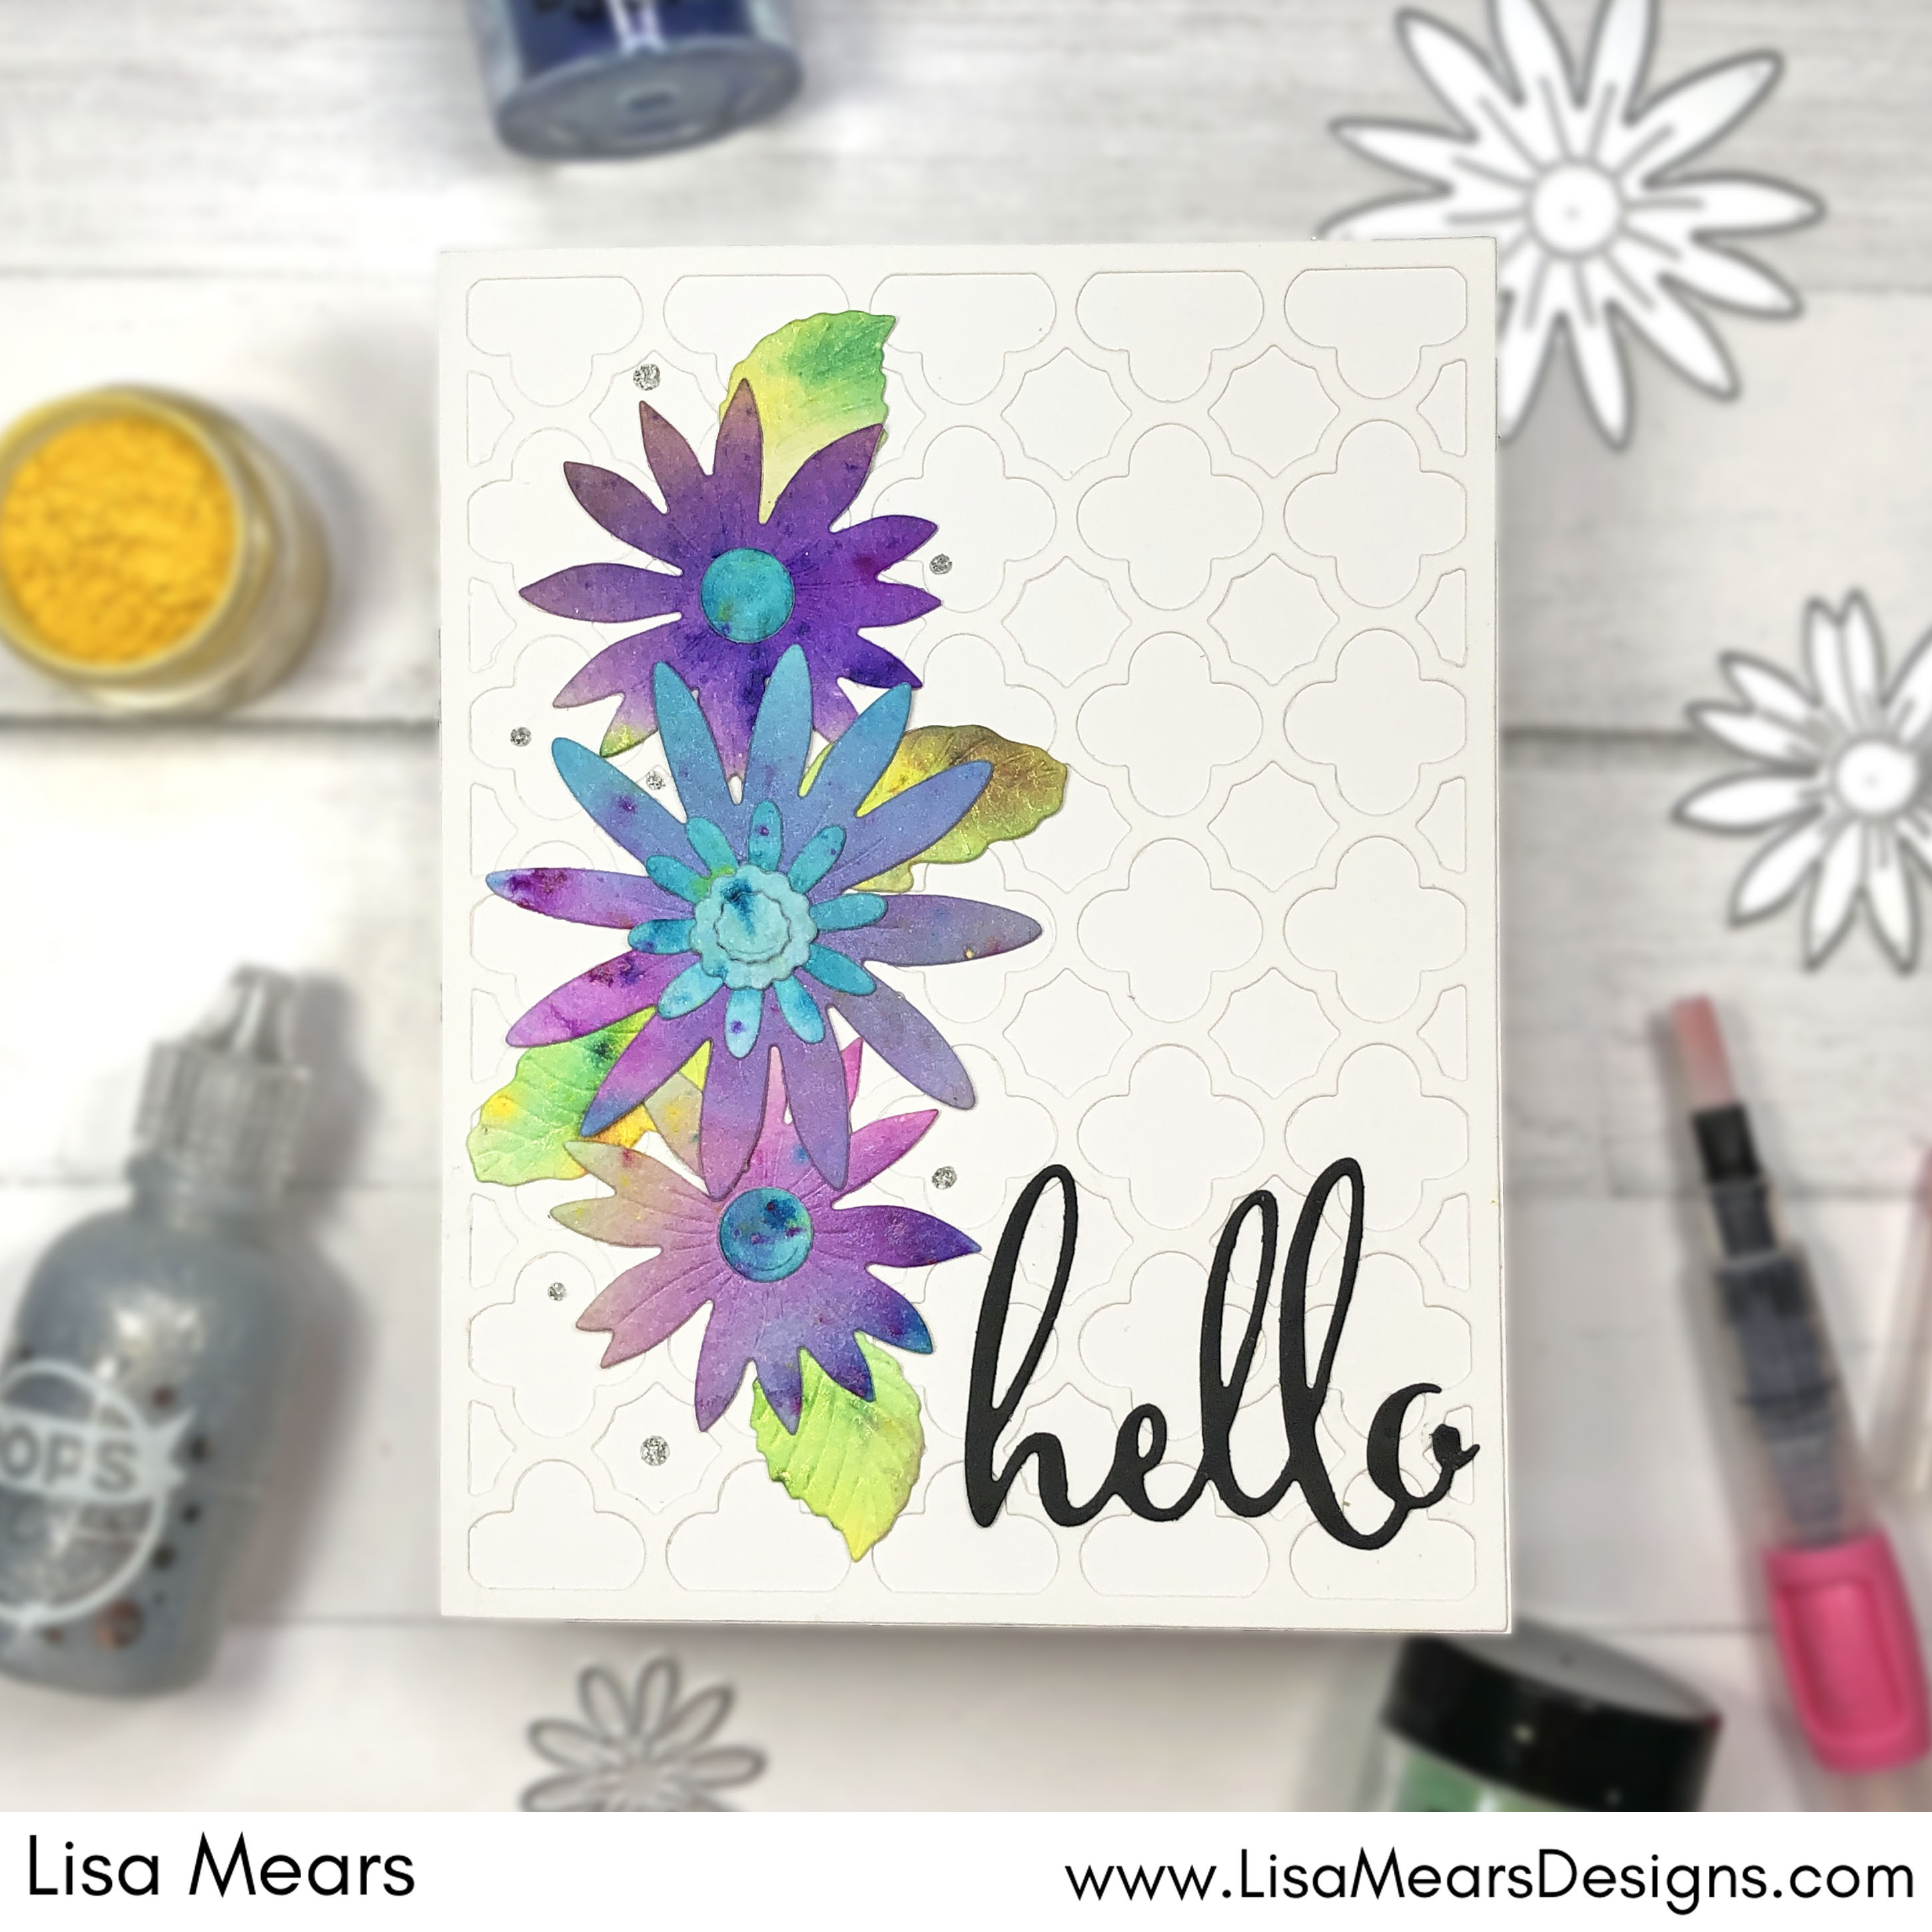
SUPPLIES USED:
- Pink and Main Water Gems Sparkling Watercolors (Colors used: Background 1 – Flamingo, Caribbean, Sunny; Background 2- Eggplant, Sunny Emerald)
- Scrapbook.com Sunny Lane Floral Dies
- Scrapbook.com Mosaic A2 Plate
- Scrapbook.com Thank You Dies
- Scrapbook.com Pops of Color, Silver Glitter
- Ranger Distress Watercolor Cardstock
- Heat Tool
- Ranger Distress Sprayer
I hope you liked my cards today. Don’t forget, you can watch a full tutorial below or on YouTube showing how I made these cards.
Thank you so much for stopping by today.
Have a wonderful day!
Lisa
Follow me for more inspiration:
- Blog – https://lisamearsdesigns.com/
- Instagram – LisaMearsDesigns
- Facebook – Lisa Mears Designs
- Pinterest – https://www.pinterest.com/lisamearsdesigns/
- You Tube – https://www.youtube.com/c/LisaMearsDesigns
- Etsy – https://www.etsy.com/shop/LisaMearsDesigns

Dear Lisa –
Super-helpful video. Love the flower card (#4, I think) and the sloth card. Your work is always superb and your directions are clear and easy to follow. I’ll check out the P&M products soon. Right now in a bit of a cash-flow desert. Blew a 5-wk-old tire — the problem wasn’t a warranteed item, so I got to buy five new tires instead of just four within the past few weeks. GAAAGH!
Lori S in PA
LikeLike