
Hello crafty friends.
I’m sharing two autumn cards featuring a few new autumn-themed products from Pretty Pink Posh.
![]()
![]()
If you would like to see how I made my cards, be sure to check out my video below or on YouTube.
For my first card, I started by creating my stenciled background. I cut a piece of cardstock to 3 1/2” x 4 3/4” and applied Candied Apple Distress Oxide ink to Layer A of the Layered Apples Stencil. I applied the ink very lightly. Next, with Layer A still over my cardstock, I added a little more ink to the bottom of each apple which added some depth to the apples.
Next, I used Layer B of the Layered Apples Stencil which is used to add the leaves to the apples. I added Twisted Citron Distress Oxide ink to the leaves. Next, I used Layer C of the Layered Apples Stencil along with Antique Linen Distress Oxide ink and added the stems.
The picture below shows what the Layered Apples Stencil looks like, however, the stenciled background in the picture is much darker than the one I created for my card. For my card, I used a much lighter hand when applying the ink because I wanted a lighter background that would not distract from the basket that I would eventually layer on top. If you want a darker look, just apply more pressure with more ink as shown.

When my stencil layer was finished, I added it to a piece of red pattern paper that measures 3 5/8” x 4 7/8”. I added that layer to a piece of green patterned paper that measures 4 1/4” x 5 1/2”.
Next, I stamped the sentiment “Many Thanks” from the Fall Envelopes Stamp Set onto white cardstock that measures 4 1/4” x 1/2” and added that to a piece of green pattern paper that measures 4 1/4” x 5/8”. I added the sentiment strip to the card front.
Next I was ready to work on my apple basket. After die cutting the Fall Basket, apples, and leaves, I assembled them on the card front.
As for my cute mouse friend, I colored him up with Zig Clean Color Real Brush Pens using Mustard, Sugared Almond Pink, and the Blender. I die cut the mouse with the coordinating dies and added it the card.
Finally, I added the panel to an A2 size card base.
![]()
For my next card, I used the Pretty Pink Posh Layered Foliage Stencil. I added a variety of fall colored inks to the stencil. I used the Gina K Designs Autumn Premium Dye Ink Cube Assortment which comes in a pack of 8 cube inks in a variety of fall colors.
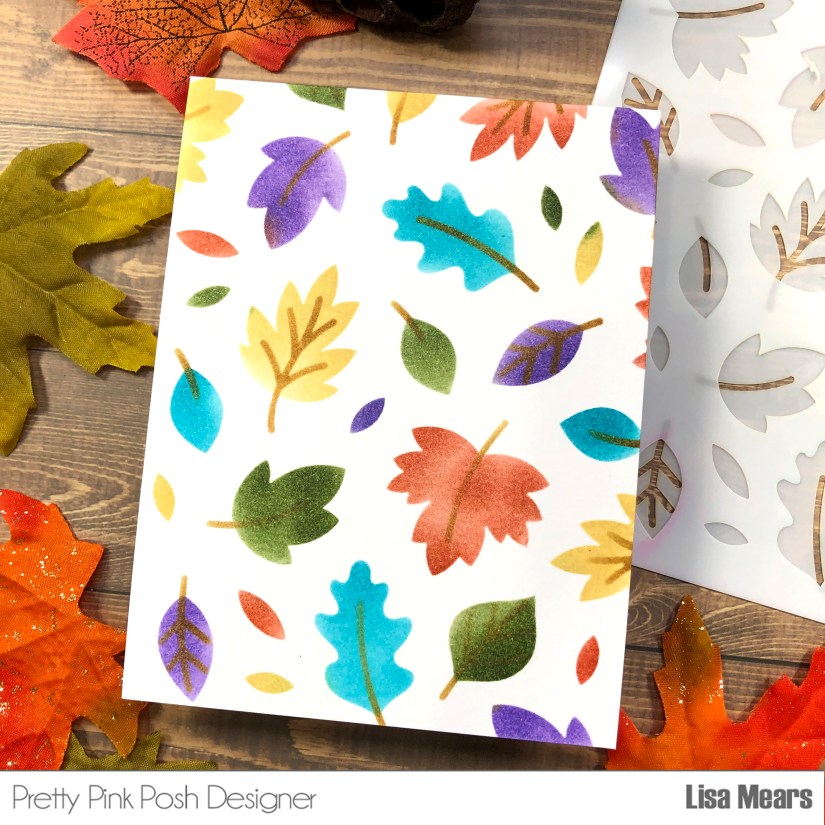
I added a spatter of gold to my background using Delicata Golden Glitz ink mixed with water. I also added the Gina K. Designs Fresh Avocado ink to white cardstock and splattered some of the gold ink on the cardstock before die cutting the leaves from the Pretty Pink Posh Fall Basket die set. I die cut the pumpkins from the same die set using orange cardstock and added Distress Oxide Carved Pumpkin ink to the edges to add some depth to the pumpkins.
![]()
I die cut a scallop circle from using the Pretty Pink Posh Scallop Circle dies. I inked the center circle with Distress Oxide Shaded Lilac ink and splattered some of the gold ink on top.
I added all of the die cut pieces to the card and added the sentiment “Happy Fall” from the Pretty Pink Posh Fall Envelopes stamp set. I added twine and then added this layer to an A2 size card base.
![]()
Thank you so much for stopping by today. Have a wonderful day!
Lisa Mears
Products Featured:
***SAVE MONEY AND GET THE BUNDLES***
Pretty Pink Posh September 2022 Release Bundle
Pretty Pink Posh Stencil Bundle #20 (all stencils)
- Pretty Pink Posh Fall Basket Dies
- Pretty Pink Posh Layered Apples Stencil
- Pretty Pink Posh Layered Foliage Stencil
- Pretty Pink Posh Mouse Friends stamp set
- Pretty Pink Posh Mouse Friends coordinating dies
- Pretty Pink Posh Fall Envelopes stamp set
- Pretty Pink Posh Scallop Circle dies
- Gina K Designs Autumn Premium Dye Ink Cube Assortment
- Delicata Golden Glitz Ink
- Tim Holtz Distress Oxide Ink, Shaded Lilac
- Tim Holtz Distress Oxide ink, Carved Pumpkin
- Tim Holtz Distress Oxide Ink, Candied Apple
- Tim Holtz Distress Oxide Ink, Antique Linen
- Tim Holtz Distress Oxide Ink, Twisted Citron
- Tim Holtz Distress Oxide Ink, Walnut Stain
- Lawn Fawn Really Rainbow Christmas Paper Pad – Out of Stock
- Scrapbookcom Harvest Paper Pad
- Sizzix Stamp and Stencil Tool
- White Gel Pen
- Trinity Stamps Pick Up Stick Tool
- Bearly Art Precision Craft Glue
- Zig Clean Color Real Brush Markers – Mustard, Sugared Almond Pink, Blender
- Bristol Smooth Cardstock
- Spellbinders Platinum Diecutting and Embossing Machine 8.5″ Platform
- Misti Stamping Tool
- Wendy Vecchi Make Art Stay-tion
- Scrapbookcom Sponge Daubers
- Versafine Onyx Black Ink
- Pixie Spray
Follow me for more inspiration:
- Blog – https://lisamearsdesigns.com/
- Instagram – LisaMearsDesigns
- Facebook – Lisa Mears Designs
- Pinterest – https://www.pinterest.com/lisamearsdesigns/
- You Tube – https://www.youtube.com/c/LisaMearsDesigns
- Etsy – https://www.etsy.com/shop/LisaMearsCardDesigns
