

Hello crafty friends.
I’m so excited to be joining Pretty Pink Posh to celebrate their January 2023 release. This release is all about Valentine’s Day and love. To celebrate this release, Pretty Pink Posh is having a blog hop where you have a chance to win one of three $30 gift certificates to the Pretty Pink Posh shop. Be sure to read all the way to the end of this post to find out more about the blog hop, see some of the cards I made with this release, and find links to all of the supplies I used to make my cards.

If you would like to see all of the products in the release, you can watch my video below or on YouTube.
You can purchase all of the products in one bundle and save 10 percent.
To purchase the January 2023 bundle click HERE.
To purchase the stencil bundle, click HERE.
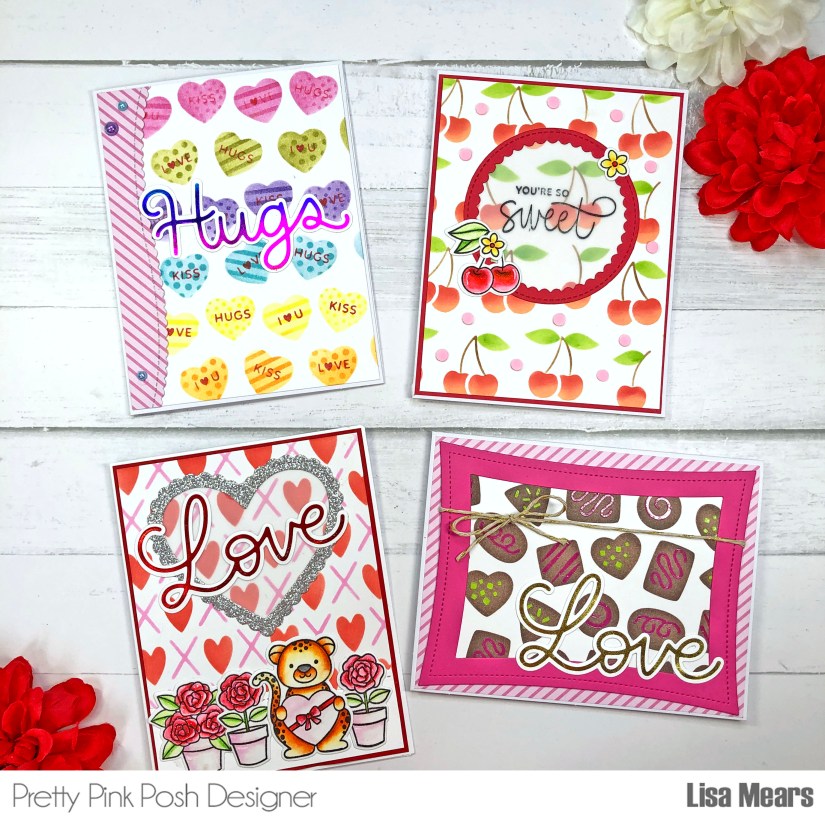
For the blog hop, I’m sharing four stenciled cards that I made with some of the new products from Pretty Pink Posh’s new release.
 If you would like to see how I made all of my cards, be sure to check out my video below or on YouTube.
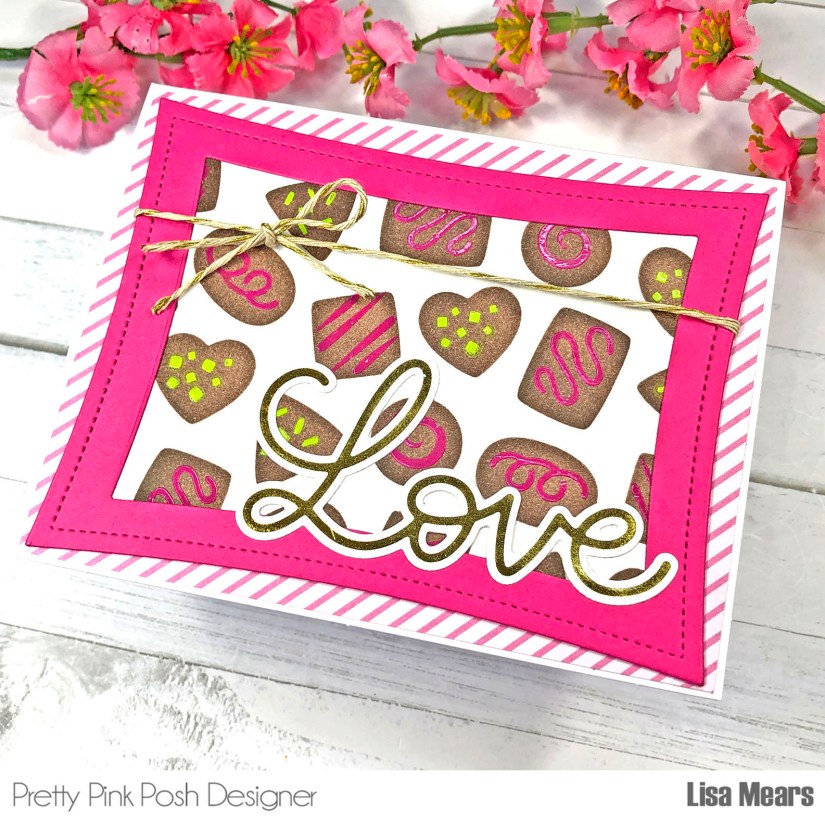
Card 1
For my first card, I used the Pretty Pink Posh Layered Chocolates stencil and made a card that resembles a candy box. I started by creating the stenciled background. For Layer A, I used Scrapbook.com Dark Chocolate ink for the shape of the chocolates. For Layer B, I added Scrapbook.com Pops of Color in the Raspberry Kiss color. The Pops of Color is a liquid embellishment that dries with 3D dimension and a glossy finish to your project. I chose to use the Pops of Color because of its vibrant color and I knew it would show up well on top of the dark brown ink that I used for the shape of the chocolates. After applying the Raspberry Kiss Pops of Color to the squiggly lines for the topping on Stencil Layer B, I let the background dry completely before adding Stencil Layer C. For Stencil Layer C, I added the Scrapbook.com Pops of Color in Key Lime for the sprinkles. Again, I let the background dry completely before moving on to the next step.
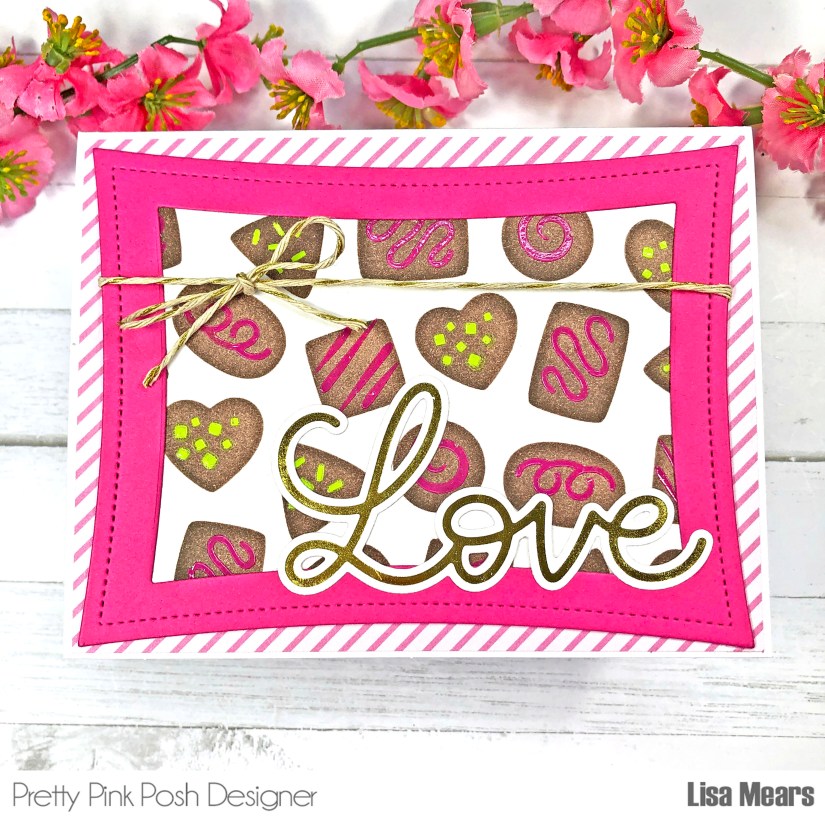
Next, I used the largest and second largest Wonky Stitched Rectangle dies to die cut the pink frame. Using the largest Wonky Stitched Rectangle, I also die cut the stenciled background. I glued the frame to the stenciled background.
For the sentiment, I hot foiled the word Love using the Pretty Pink Posh Hot Foil Large Love and die cut it with the coordinating Large Love Shadow.
I tied a piece of twine around the Wonky Stitched Rectangle panel and then added that layer to a piece of pattern paper that I cut to 4 1/8″ x 5 3/8″. Next, I added it to an A2 size card base.
If you want to see how I made this card, watch my video on YouTube.
Products Featured:
- Pretty Pink Posh Layered Chocolates Stencil
- Pretty Pink Posh Wonky Stitched Rectangles
- Pretty Pink Posh Hot Foil Large Love
- Pretty Pink Posh Large Love Shadow
- Scrapbook.com Pops of Color – Key Lime and Raspberry Kiss
- Scrapbook.com Dark Chocolate Ink
- Scrapbook.com Ink Blending Tool
- Ranger Palette Knife
- Spellbinders Glimmer Hot Foil System
- Spellbinders Black Platinum Diecutting and Embossing Machine
- Spectrum Noir Ultra Smooth White Cardstock (for hot foiling)
- Spellbinders Gold Hot Foil
- Wendy Vecchi Make Art Stay-tion
Card 2
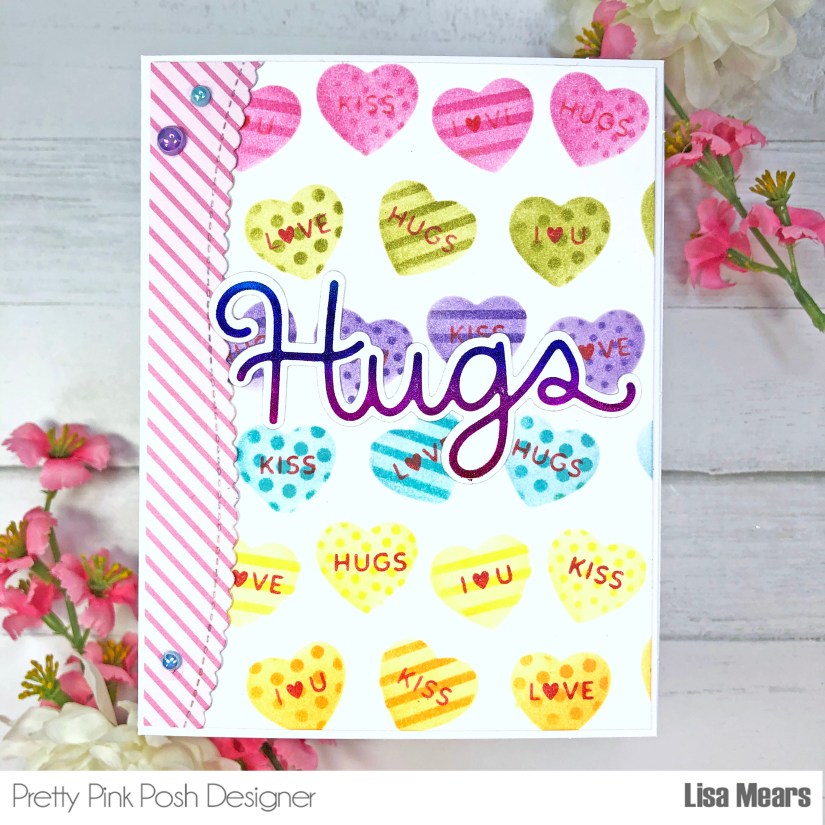
For my next card, I used the Pretty Pink Posh Layered Valentine Hearts stencil to make a card that looks like the conversation hearts candy that is popular for Valentine’s Day. The Layered Valentine Hearts stencil is a four layer stencil which includes the heart shapes (Layer A), the dots for the hearts (Layer B), the stripes for the hearts (Layer C), and the words (Layer D). This pack of stencils has so much versatility because you can pick and choose which stencils you want to use. For example, you can use just the Layer A stencil to get a background full of hearts. You can also use the Layer A stencil with the hearts and add a design to the hearts with the dots from Layer B and the stripes from Layer C. You can also use all four stencils together to get the conversation hearts background as shown in the picture below.
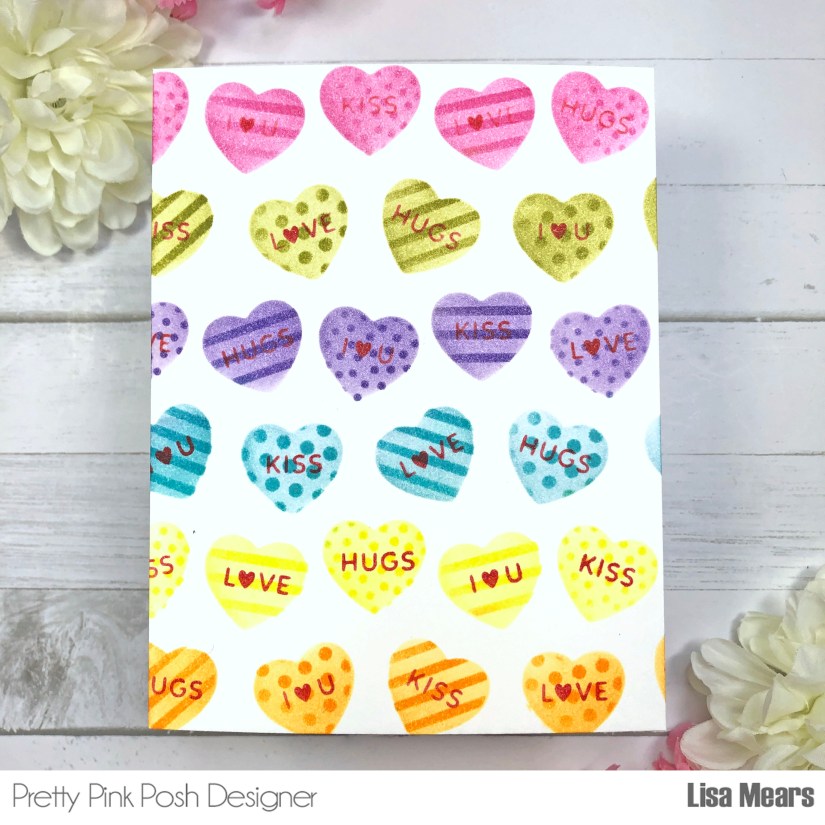
While inking stencil Layer A, I masked off each row with Scrapbook.com Mint Tape in order to get different colors of ink for each row of hearts. I used the Scrapbook.com Hybrid inks in the following colors: Pink Flamingo Ink, Pear, Parisian Purple, Sky Blue, Lantern Light, and Orange Cream.
I used the same color inks to add the dots (Layer B) and stripes (Layer C), just adding a little more ink to make it look darker on top of the solid heart shape. For Layer D, I used Scrapbook.com Cardinal Red ink to add a red ink color to the words.
For the sentiment, I hot foiled the word Hugs from rainbow hot foil using the Hot Foil Large Hugs and die cut it with the coordinating Large Hugs Shadow. I used the Scallop Border die to die cut a border from pattern paper and added it to the left side of the stenciled cardstock.
I added the Pretty Pink Posh Blue Sky Pearls and Lilac Pearls to the card front and added it to an A2 size card base.
If you want to see how I made this card, click here to watch the video on YouTube.
Products Featured:
- Pretty Pink Posh Layered Valentine Hearts Stencil
- Pretty Pink Posh Hot Foil Large Hugs
- Pretty Pink Posh Large Hugs Shadow
- Pretty Pink Posh Scallop Border Die
- Pretty Pink Posh Blue Sky Pearls
- Pretty Pink Posh Lilac Pearls
- Scrapbook.com Mint Tape
- Scrapbook.com Ink Blending Tool
- Scrapbook.com Inks: Pink Flamingo, Pear, Parisian Purple, Sky Blue, Lantern Light, Orange Cream, Cardinal Red
- Spellbinders Glimmer Hot Foil System
- Spellbinders Black Platinum Diecutting and Embossing Machine
- Spectrum Noir Ultra Smooth White Cardstock (for hot foiling)
- Spellbinders Hot Foil – Rainbow
- Wendy Vecchi Make Art Stay-tion
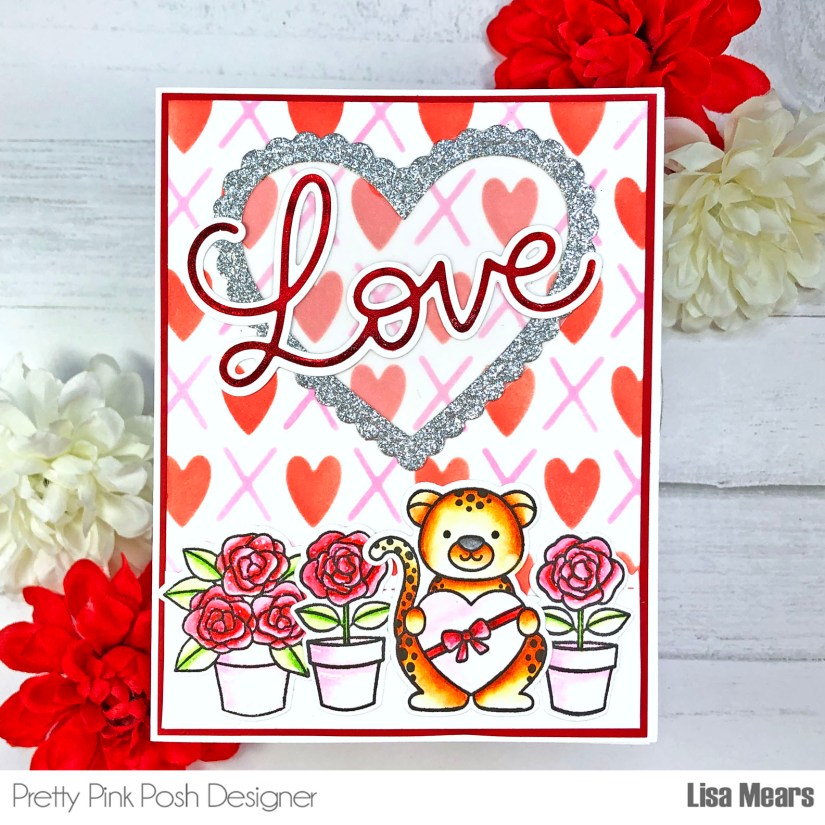
Card 3
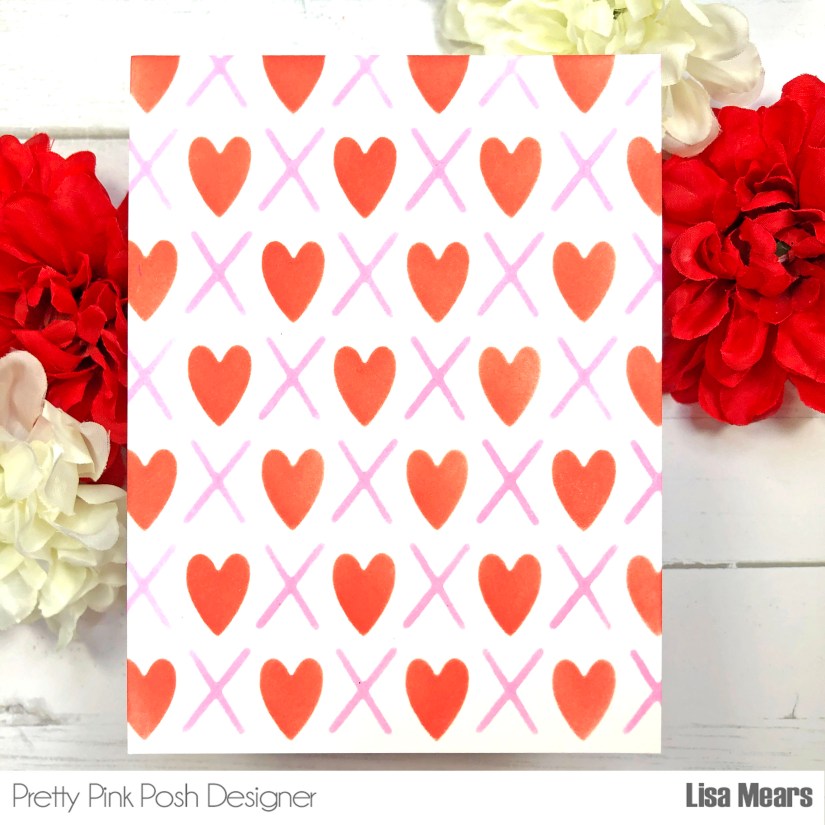
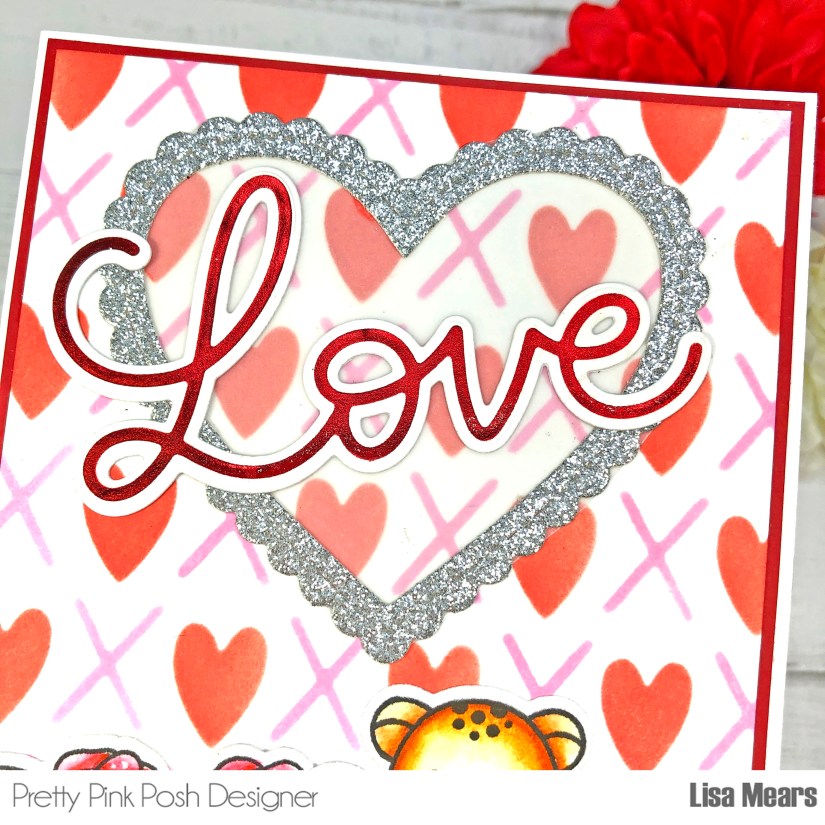
For my next card, I used the Pretty Pink Posh XOXO stencil. This is a three layer stencil that consists of the following layers — Layer A is the X’s, Layer B is the hearts, and Layer C is the O’s. For my card, I used Layer A and Layer B to create a background full of X’s and hearts. For the X’s on Layer A, I used Distress Oxide Kitsch Flamingo Ink and for the hearts on Layer B, I used Distress Oxide Candied Apple Ink. I cut the panel down to 4″ x 5 1/4″.
Next, I stamped the leopard from the Pretty Pink Posh Heart Critters stamp set onto Bristol Smooth cardstock and colored it with Zig Clean Color Real Brush Pens. I used the following pens:
Leopard – Brown, Orange, Bright Yellow, Blender
Nose – Cool Gray 6, Blender
Heart – Sugar Almond Pink, Blender
Bow – Red, Blender
I stamped the roses from the Pretty Pink Posh Potted Roses stamp set and colored them as follows:
Rose – Deep Red, Red, Blender
Leaves – Light Green, Blender
Flower Pot – Sugar Almond Pink, Blender
I added a White Gel Pen to add depth the images.
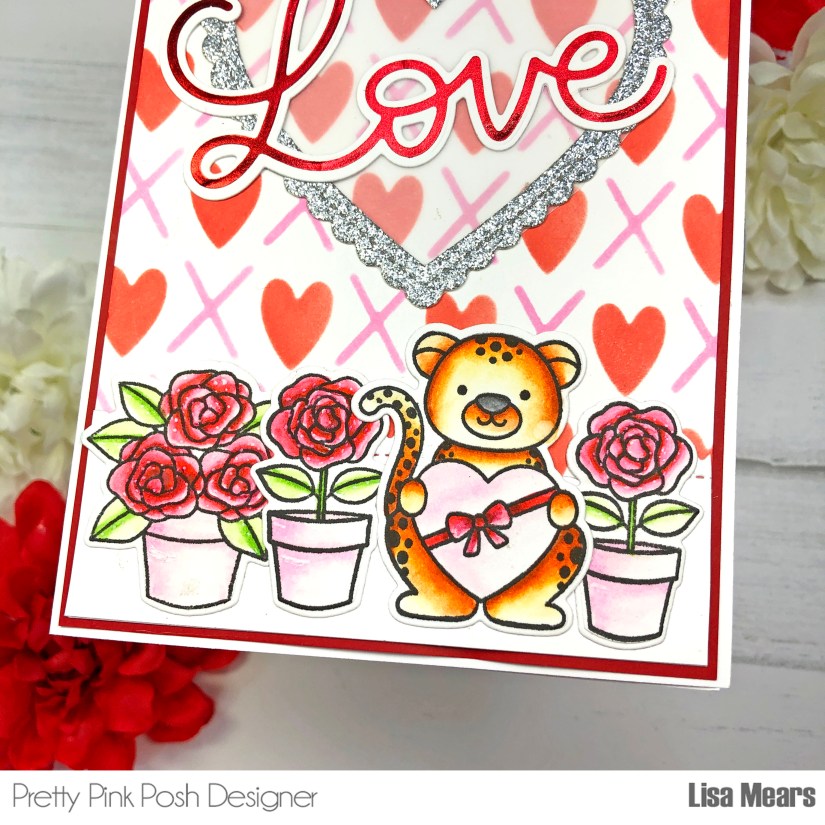
For the sentiment, I hot foiled the word Love using the Pretty Pink Posh Hot Foil Large Love and die cut it with the coordinating Large Love Shadow. I added it to the top of the heart die cut from the Pretty Pink Posh Love Shaker die. I added a piece of vellum underneath the heart to soften the stenciled background so the hot foil Love stands out.
Next, I added the decorated card layer to a piece of red cardstock that measures 4 1/8″ x 5 3/8″ and then added it to an A2 card base.
If you want to see how I made this card, click here to watch the video on YouTube.
Products Featured:
- Pretty Pink Posh Layered XOXO Stencil
- Pretty Pink Posh Heart Critters Stamp Set and Coordinating Dies
- Pretty Pink Posh Potted Roses Stamp Set and Coordinating Dies
- Pretty Pink Posh Hot Foil Large Love
- Pretty Pink Posh Large Love Shadow
- Pretty Pink Posh Love Shaker Die
- Pretty Pink Posh Scallop Border Dies
- Spellbinders Glimmer Hot Foil System
- Spellbinders Black Platinum Diecutting and Embossing Machine
- Spectrum Noir Ultra Smooth White Cardstock (for hot foiling)
- Spellbinders Hot Foil – Red
- Bristol Smooth Cardstock (for stamping)
- Versafine Onyx Black Ink (for stamping)
- Scrapbookcom Ink Blending Tool
- Lawn Fawn Vellum
- Ink for Stencil: Distress Oxide Kitsch Flamingo Ink and Distress Oxide Candied Apple Ink
- Scrapbook.com Ink Blending Tool
- Wendy Vecchi Make Art Stay-tion
- White Gel Pen
- Zig Clean Color Real Brush Pens
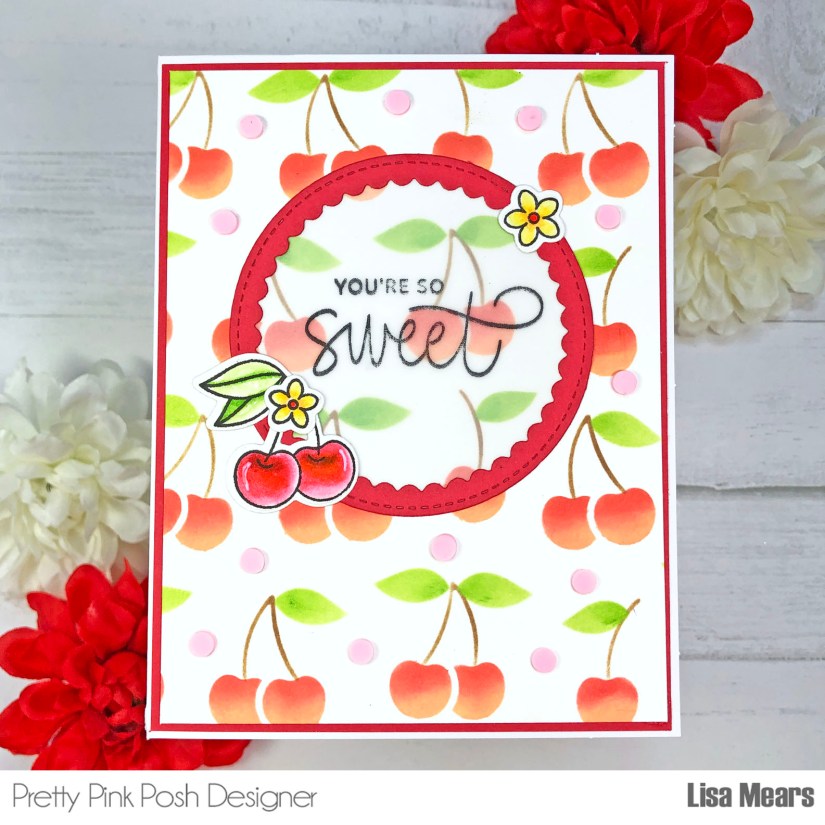
Card 4
For this card, I used the Pretty Pink Posh Layered Cherries Stencil. I used the following inks:
Layer A (cherries): Distress Oxide Ink – Dried Marigold and Candied Apple
Layer B (stems): Distress Oxide Ink – Vintage Photo
Layer C (leaves): Distress Oxide Ink – Mowed Lawn
After stenciling the background, I cut my cardstock to 4″ x 5 1/4″

I stamped the cherries and flowers from the Pretty Pink Posh Sweet Cherries stamp set and colored the images with Zig Clean Color Real Brush Pens in the following colors:
Cherries – Deep Red, Red, Blender
Leaves – Light Green, Blender
Flowers – Bright Yellow, Yellow, Blender, Red (center)
I added a Pretty Pink Posh Scallop Circle to the center with a piece of vellum underneath. I stamped the sentiment onto the vellum with Stazon Jet Black Ink.
I added pink clay confetti pieces from the Pretty Pink Posh Strawberry Shortcake clay confetti mix. Finally, I added the decorated layer to a piece of red cardstock that measures 4 1/8″ x 5 3/8″ and then added it to an A2 card base.
Products Featured:
- Pretty Pink Posh Layered Cherries Stencil
- Pretty Pink Posh Sweet Cherries Stamp and Coordinating Dies
- Pretty Pink Posh Scallop Circle Die
- Pretty Pink Posh Strawberry Shortcake Clay Confetti
- Ink for Stencil – Distress Oxide Ink in Dried Marigold, Candied Apple, Vintage Photo, Mowed Lawn
- Ranger Detail Blending Brush
- Scrapbook.com Ink Blending Tool
- Bristol Smooth Cardstock (for stamping)
- Lawn Fawn Vellum
- Misti
- Stazon Jet Black Ink (for sentiment)
- Versafine Onyx Black Ink (for stamping/coloring)
- Zig Clean Color Real Brush Pens
Be sure to follow along in the Pretty Pink Posh Blog Hop where you have a chance to win one of three $30 gift certificates to the Pretty Pink Posh store. Winners will be picked randomly along the blog hop. Comments must be left by 11:59 pm PST on 1/12/2023. Winners will be announced on the PPP blog.
Below are blog links for the other blog hop participants.
Thank you so much for stopping by today. Have a sweet day!
Follow me for more inspiration:
- Blog – https://lisamearsdesigns.com/
- Instagram – LisaMearsDesigns
- Facebook – Lisa Mears Designs
- Pinterest – https://www.pinterest.com/lisamearsdesigns/
- You Tube – https://www.youtube.com/c/LisaMearsDesigns
- Etsy – https://www.etsy.com/shop/LisaMearsCardDesigns

Beautiful cards!
LikeLiked by 1 person
Lisa, your cards are delightful!!! You’ve reminded me of a technique I’d forgotten! Thanks for the inspiration 🙂
LikeLiked by 1 person
Wow, so many amazing cards. Love them all!
Valerija xx
LikeLiked by 1 person